
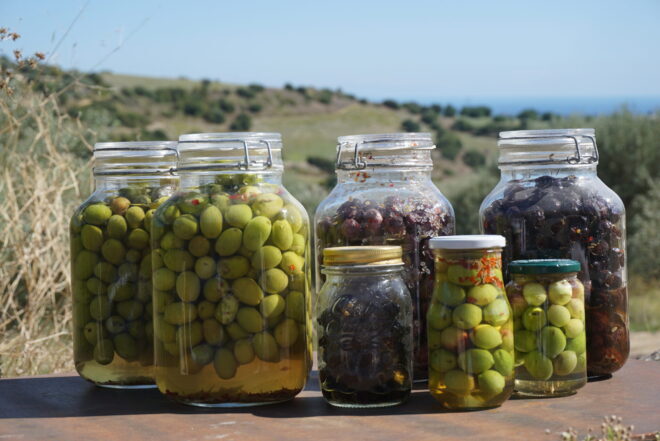
freezing, canning, and pickling.
Preserving the bounty of the harvest through various methods like freezing, canning, and pickling is a timeless practice that not only extends the shelf life of fruits and vegetables but also captures the essence of seasonal flavors to enjoy year-round.
Freezing: Freezing is like nature’s pause button for food. It allows you to capture the freshness and nutrients of fruits and vegetables at their peak. With a flash-freezing technique, produce retains its texture and flavor. Whether it’s strawberries in the dead of winter for a taste of summer or peas from the garden for a springtime soup in autumn, freezing lets you savor the seasons whenever you choose.
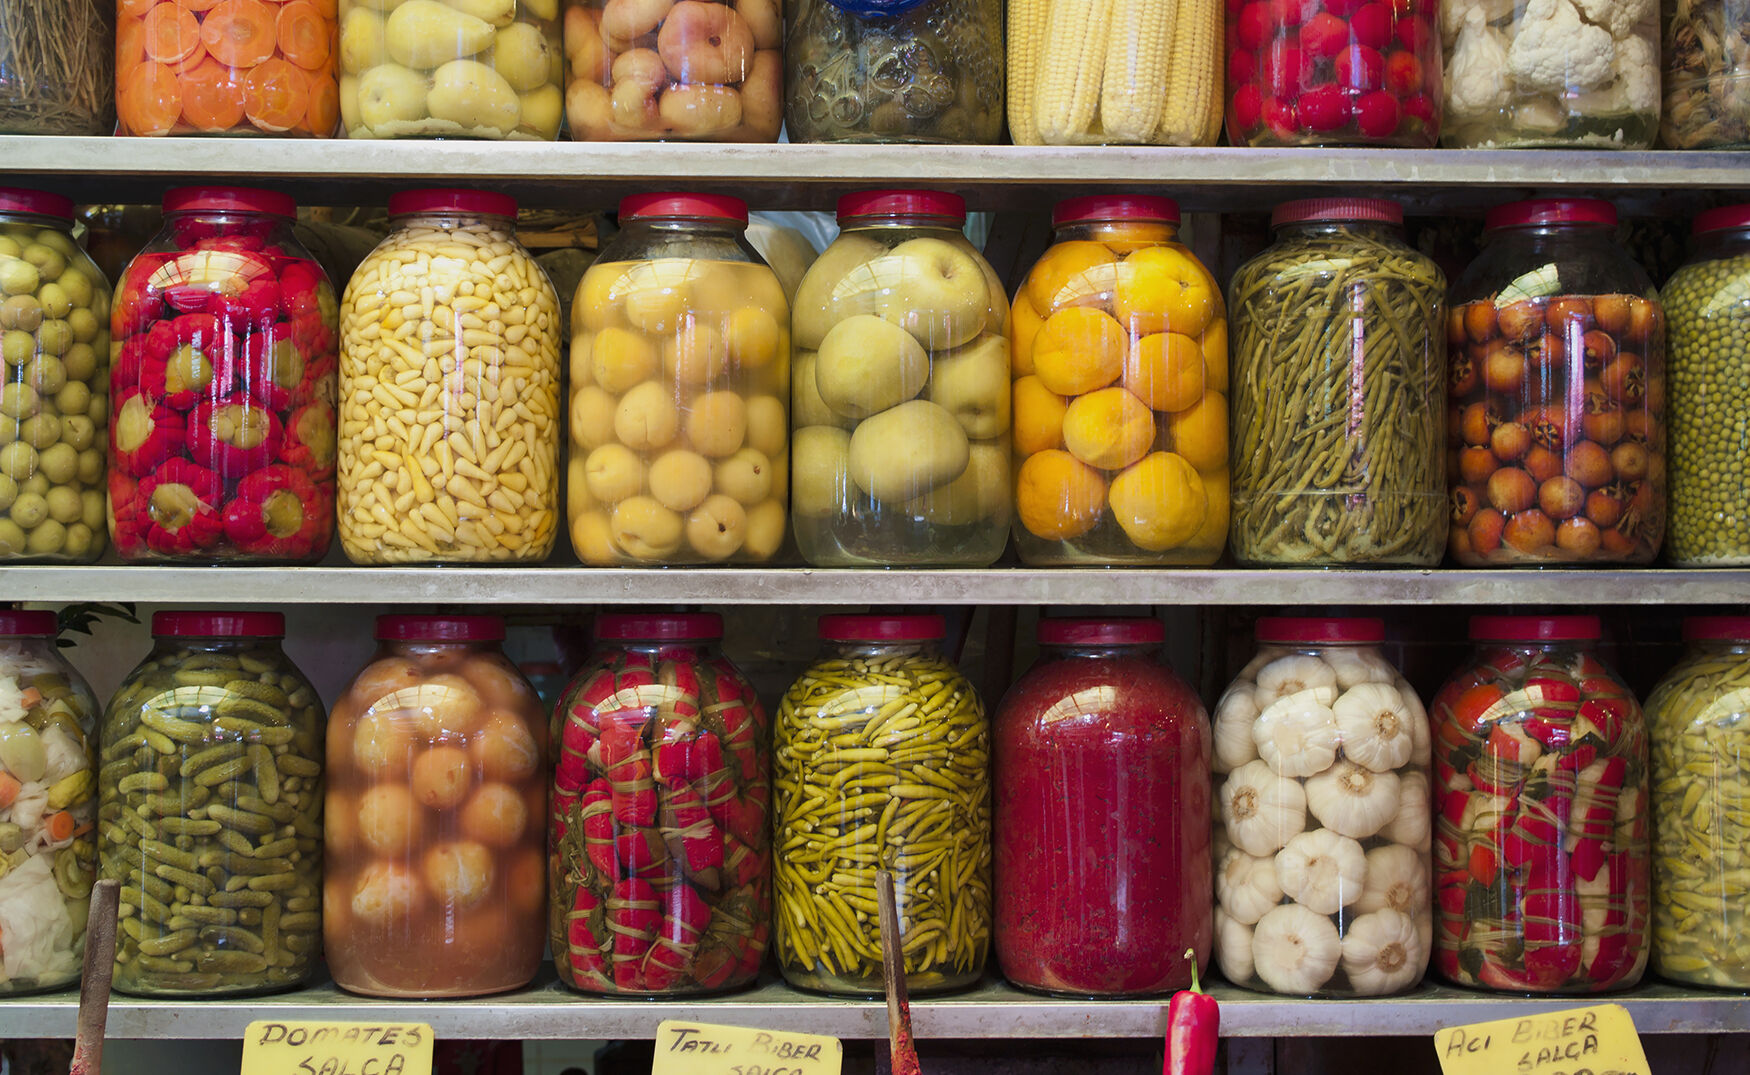
Canning: Canning has been a trusted method for preserving fruits, vegetables, and even meats for generations. The process involves sealing food in airtight containers after heating to destroy bacteria and enzymes that cause spoilage. Whether you’re making homemade jams, jellies, or pickles, canning not only preserves the taste of summer but also allows for creative experimentation with flavors and recipes.
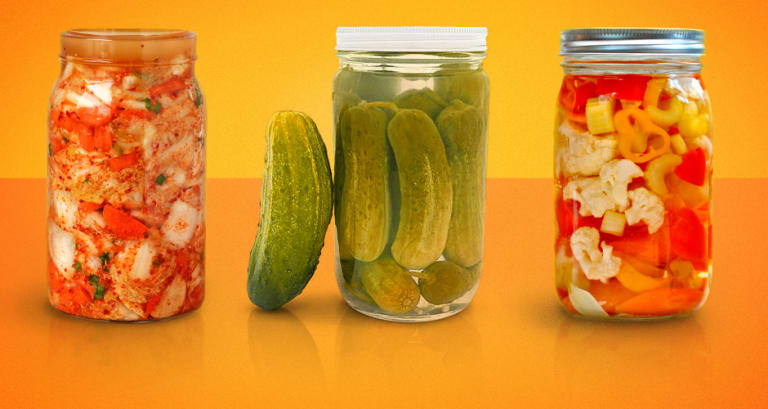
Pickling: Pickling takes preservation to another level with the addition of vibrant and zesty flavors. Submerging vegetables in a mixture of vinegar, salt, and spices not only extends their shelf life but also infuses them with a delightful tanginess. Pickles, be they classic cucumber dills, pickled onions, or fiery jalapeños, add a burst of excitement to meals throughout the year.
These methods of food preservation are not just practical; they are also an art form, allowing you to become a culinary curator of your own pantry. Beyond ensuring food security and minimizing waste, they connect you to time-honored traditions, allowing you to pass down family recipes and create your own signature preserves.
Preserving also encourages you to forge a deeper connection with the seasons and the land. It prompts you to savor each crop’s peak and anticipate its return. And in a world of instant gratification, there’s a unique satisfaction in opening a jar of homemade pickles or a bag of frozen berries that you nurtured and preserved with your own hands, extending the joy of seasonal abundance throughout the year.
For additional details, consider exploring the related content available here Edible Santa Barbara Spring/Summer 2021
Freezing is one of the most popular and straightforward methods for preserving asparagus while retaining its fresh flavor and crisp texture. Here’s how to freeze asparagus:
Preserving the vibrant essence of asparagus through freezing is a tried-and-true method that allows you to enjoy its fresh flavor and crisp texture long after the harvest season has passed. Whether you have a surplus of asparagus from your garden or simply want to savor its goodness year-round, freezing is a straightforward and effective approach. Here’s a step-by-step guide on how to freeze asparagus to ensure that it retains its quality and flavor:
Choose the Best Asparagus: Begin with fresh, high-quality asparagus. Look for spears that are firm, tender, and free from blemishes or signs of aging. Ideally, harvest or purchase your asparagus when it’s at its peak, as this will ensure the best flavor and texture after freezing.
Wash and Trim: Start by washing the asparagus thoroughly under cold running water to remove any dirt or debris. Then, trim the woody ends from each spear. A handy tip is to hold a spear and bend it gently; it will naturally snap where the tender part begins. Use this snapped spear as a guide to trim the others to a uniform length.
Blanching: Blanching is a crucial step that helps preserve the color, flavor, and texture of asparagus while also eliminating any potential enzymes that could cause deterioration during freezing. Bring a large pot of water to a rolling boil and prepare a bowl of ice water. Submerge the trimmed asparagus in the boiling water for about 2-3 minutes, depending on the thickness of the spears. Then, immediately transfer them to the ice water bath to halt the cooking process. Drain and pat dry.
Packaging: To prevent freezer burn and maintain freshness, it’s essential to package the blanched asparagus properly. There are a few options:
Vacuum Sealing: If you have a vacuum sealer, it’s an excellent choice for preserving asparagus. Seal the spears in airtight bags, removing as much air as possible.
Freezer Bags: Alternatively, you can use heavy-duty freezer bags. Lay the blanched asparagus in a single layer inside the bag and squeeze out excess air before sealing. Consider portioning them into meal-sized servings for convenience.
Label and Date: Don’t forget to label the packages with the date of freezing. This will help you keep track of their freshness and ensure that you use the oldest packages first.
Freeze: Place the properly packaged asparagus in the freezer. For optimal preservation, it’s best to store them in a single layer initially until they are completely frozen. Once frozen, you can stack the packages to save space.
Enjoy: Frozen asparagus can be stored for up to 8-12 months, although it’s best to use them within the first 6 months for the best quality. When you’re ready to enjoy them, there’s no need to thaw. You can cook the frozen spears directly in recipes like stir-fries, soups, or casseroles. Alternatively, you can steam or roast them from frozen for a quick and nutritious side dish.
By following these steps, you can capture the vibrant essence of fresh asparagus and savor it throughout the year, whether you’re adding it to your favorite dishes or simply enjoying its delicious crunch as a side. Freezing is a versatile and convenient way to preserve this beloved springtime vegetable and extend its culinary possibilities well beyond its seasonal availability.
Should you desire more in-depth information, it’s available for your perusal on this page: Pickled Asparagus (3 Ways!)
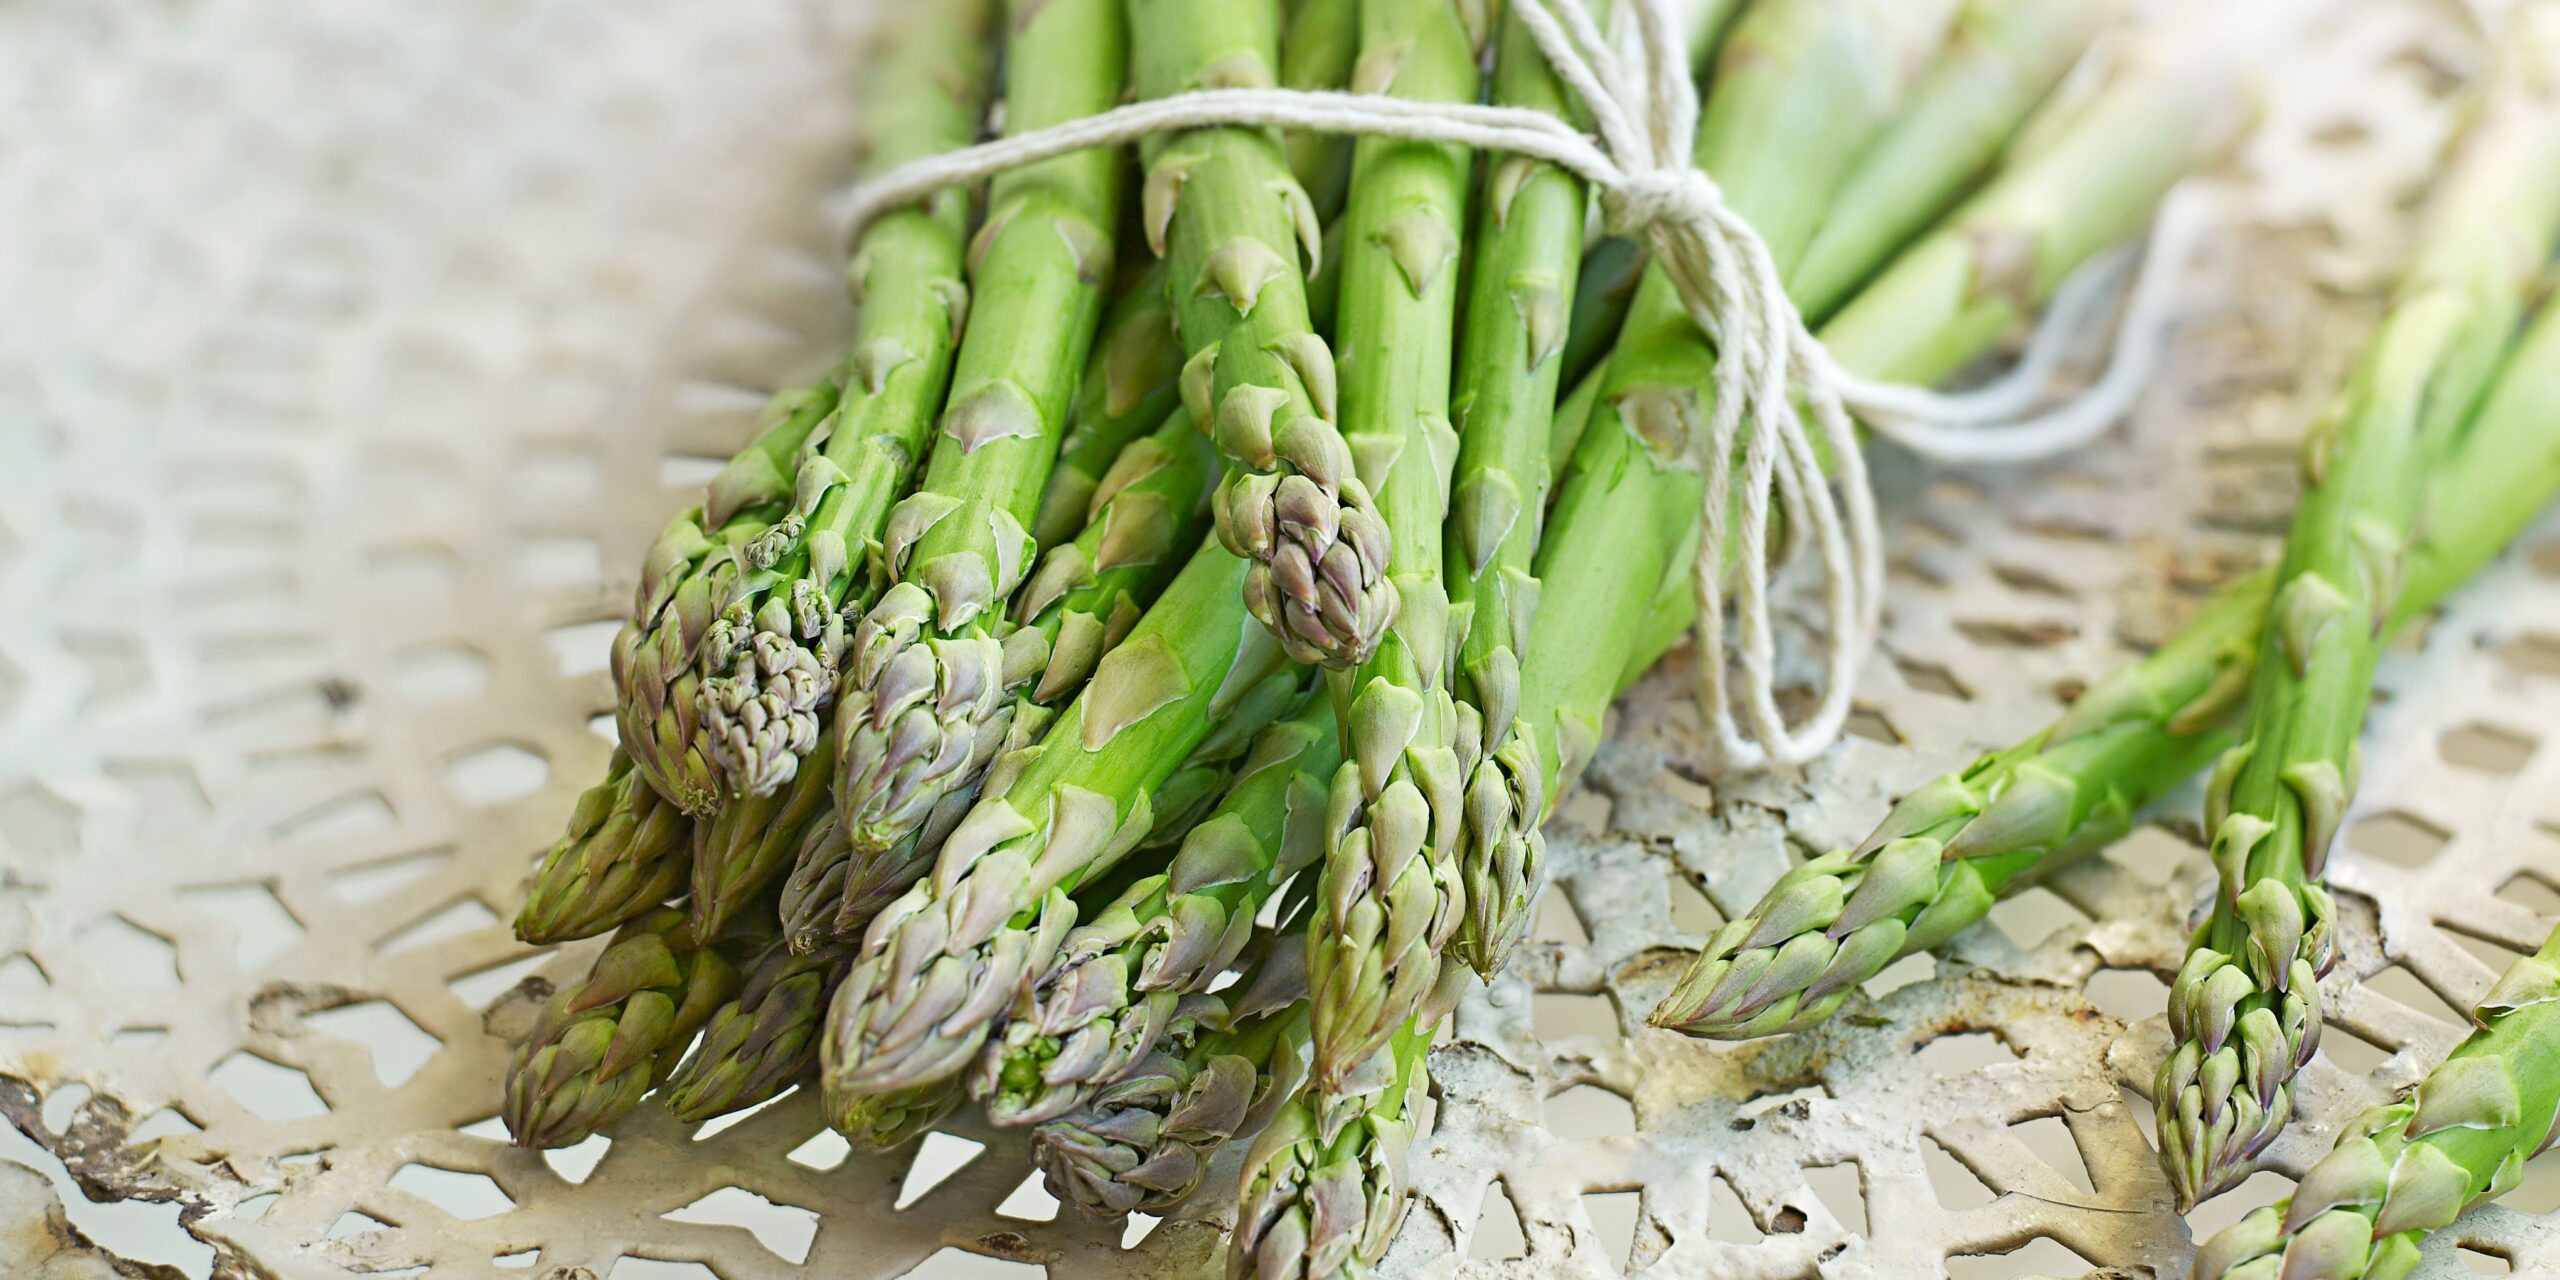
Start by washing and trimming the asparagus, removing tough ends.
“Embarking on your culinary journey with asparagus begins with a simple yet essential step: preparing the asparagus for its starring role in your dish. Here’s a guide to kickstart your culinary adventure:
Selecting Fresh Asparagus: The journey commences at the market or grocery store. Look for fresh asparagus bundles with vibrant green stalks. Check for firmness and uniformity in size, as this indicates freshness. Avoid asparagus with wilted or slimy stalks.
Wash with Care: Once you have your asparagus in hand, the next step is to give them a gentle rinse. Place the asparagus in a colander or under cool running water. Gently rub the stalks with your fingers to remove any residual dirt or sand. A quick rinse is all that’s needed; there’s no need to soak them.
Trimming for Perfection: As you prepare to trim the asparagus, remember that this step not only enhances the aesthetics of your dish but also ensures tenderness and an enjoyable eating experience. The lower part of asparagus stalks can be tough and fibrous, so it’s crucial to remove them.
The Bend and Snap Method: Hold an asparagus spear near the bottom and gently bend it. The spear will naturally snap where the tough part ends. Discard the lower portion. This technique is efficient and ensures that you remove only what’s necessary.
Uniform Length: For presentation purposes, it’s advisable to trim all the asparagus spears to a uniform length. This not only looks visually appealing but also ensures even cooking.
Optional Peeling: While most asparagus can be enjoyed as is, thicker stalks can benefit from a light peeling with a vegetable peeler. This removes any tougher outer skin and results in a more consistent texture when cooked.
Save the Ends for Broth: Don’t throw away those trimmed ends! They can be used to make a flavorful vegetable broth. Simply simmer them with other vegetable scraps and herbs to create a homemade stock that can be used in soups and sauces.
With your asparagus washed, trimmed, and ready for action, you’re now well-prepared to embark on your culinary adventure. Whether you’re roasting, sautéing, or steaming, this preparation process ensures that your asparagus dishes will not only taste delightful but also showcase the elegance of this versatile vegetable.”
For additional details, consider exploring the related content available here Asparagus – Ways to preserve and prepare – recipes included!
Bring a large pot of water to a boil and add the trimmed asparagus. Blanch them for 2-3 minutes, depending on their thickness. This blanching process helps preserve the color, flavor, and texture of the asparagus while killing any bacteria.
When it comes to preparing asparagus to perfection, the blanching step is a culinary secret that can make all the difference. As you bring a generously sized pot of water to a rolling boil, you’re setting the stage for a burst of vibrant green goodness on your plate.
Trimmed and ready, the asparagus spears take a quick plunge into the boiling water. The blanching process, lasting a mere 2-3 minutes, is a crucial step in the journey from the garden to your table. It’s a magical moment when the asparagus undergoes a transformation, unlocking its full potential.
First and foremost, blanching preserves the exquisite green color of the asparagus. The brief dip in boiling water halts the enzymatic activity that can cause the vegetable to turn dull and drab. Instead, you’re left with spears that practically shimmer with freshness and vibrancy, a feast for the eyes as well as the palate.
Beyond aesthetics, blanching also retains the distinct flavor of asparagus. It ensures that the vegetable maintains its natural taste, avoiding any overpowering or off-putting notes. This means you can fully savor that delightful, earthy sweetness that makes asparagus a culinary favorite.
Texture is another crucial aspect that blanching safeguards. By cooking the asparagus briefly, you achieve that perfect balance between tender and crisp. The spears remain pleasantly toothsome, offering a satisfying bite that complements a variety of dishes, from salads to stir-fries.
Blanching isn’t just about enhancing the asparagus itself; it’s also a vital safety measure. This step effectively eliminates any potential bacteria, ensuring that your meal is not only delicious but also safe to consume. It’s a small yet significant detail that underscores the importance of proper preparation in the kitchen.
So, the next time you’re in the kitchen with fresh asparagus in hand, remember the magic of blanching. Those 2-3 minutes in boiling water do more than preserve color, flavor, and texture; they elevate your culinary experience, ensuring that each bite of asparagus is a delectable celebration of freshness and safety.
For additional details, consider exploring the related content available here Michigan Fresh: Using, Storing, and Preserving Asparagus (HNI28 …
Immediately transfer the blanched asparagus to an ice water bath to halt the cooking process. Once cooled, drain them thoroughly.
The swift transfer of blanched asparagus into an ice water bath is a pivotal step in preserving their vibrant color, crisp texture, and flavor. However, the process doesn’t end there; here’s why draining them thoroughly after cooling is equally essential:
Preventing Overcooking: Plunging the asparagus into ice water promptly halts the cooking process, preventing them from becoming mushy or losing their bright green hue. This quick cooling maintains the desired crispness and tenderness.
Removing Excess Moisture: As the asparagus sit in the ice water bath, they absorb a small amount of water. This moisture, if not removed, can dilute the flavors and affect the overall texture of your dish. Properly draining the asparagus ensures that they retain their natural taste and mouthfeel.
Enhancing Seasoning Absorption: If you plan to season or dress the blanched asparagus later, removing excess moisture is crucial. Dry asparagus readily absorbs dressings, sauces, or vinaigrettes, allowing the flavors to penetrate more effectively.
Aesthetics: Well-drained asparagus not only taste better but also look more appealing on the plate. Excess water can dilute any sauces or seasonings you add, diminishing the visual and sensory impact of your dish.
Recipe Success: Many recipes, especially those involving asparagus in salads, quiches, or stir-fries, require precise moisture control. Thoroughly drained asparagus ensure that your recipe turns out as intended, with balanced flavors and textures.
Consistency: Consistency in cooking is key to achieving the desired results. By following the blanching process with thorough draining, you ensure that your asparagus consistently meet the quality standards of your dishes.
Reducing Sogginess: Asparagus with excess moisture can lead to soggy and unappetizing dishes, especially in recipes where maintaining a crisp texture is essential. Proper draining safeguards against this culinary pitfall.
Meal Presentation: Well-drained asparagus present beautifully on the plate, enhancing the visual appeal of your dishes. This is particularly important in professional or home cooking when presentation matters.
In summary, blanching asparagus and immediately transferring them to an ice water bath is just the first part of the equation for culinary success. Properly draining them after they’ve cooled ensures that you achieve the desired texture, flavor, and consistency in your dishes. It’s a small but crucial step that significantly contributes to the overall quality of your culinary creations.
To expand your knowledge on this subject, make sure to read on at this location: Preserving spring asparagus – MSU Extension

Divide the asparagus into portion-sized bunches and place them in zip-top freezer bags or airtight containers. Remove excess air to prevent freezer burn.
Ensuring the quality of your frozen asparagus goes beyond simply sealing it in bags or containers. The following tips will help you preserve the vibrant green color, flavor, and texture of your asparagus for an extended period in the freezer:
Blanch Before Freezing: Blanching, a quick boil followed by an ice water bath, is a crucial step to halt enzyme activity that can degrade the quality of asparagus during storage. After blanching, pat the asparagus dry to remove excess moisture, which can lead to freezer burn.
Portion Control: Dividing your asparagus into portion-sized bunches is not only convenient but also preserves the quality of the asparagus. Smaller portions allow you to thaw only what you need, reducing waste and ensuring that the remaining asparagus stays frozen.
Vacuum Sealing: While zip-top freezer bags and airtight containers work well, consider investing in a vacuum sealer. These devices remove air more effectively, reducing the risk of freezer burn and prolonging the asparagus’s shelf life.
Labeling and Dating: It’s a good practice to label your frozen asparagus with the date of freezing. This helps you keep track of the freshness and ensures that you use the oldest packages first, following the first-in, first-out (FIFO) method.
Uniform Packaging: For uniform packaging, lay the asparagus spears flat in a single layer in the bag or container. This prevents them from sticking together, making it easier to remove individual portions when needed.
Avoid Frost and Ice: Ensure that the asparagus is dry before packaging it for freezing. Excess moisture can lead to the formation of frost and ice crystals, which can negatively impact the texture and flavor of the asparagus.
Temperature Management: Maintain a consistent temperature in your freezer. Fluctuations in temperature can cause freezer burn. Try not to overcrowd your freezer, as good air circulation helps maintain a steady temperature.
Use a Deep Freezer: If you have a large quantity of asparagus to freeze, consider using a deep freezer, as they typically provide a more stable temperature and humidity level than regular fridge-freezer combos.
Thawing Techniques: When you’re ready to use your frozen asparagus, opt for slow thawing in the refrigerator. This gradual process helps preserve the texture and flavor. Avoid thawing in warm water or at room temperature, as it can lead to undesirable mushiness.
By following these steps, you can ensure that your frozen asparagus remains as fresh and flavorful as possible. Proper blanching, portioning, sealing, and storage techniques are key to extending the shelf life of your frozen asparagus while maintaining its quality for use in a variety of culinary creations.
For a comprehensive look at this subject, we invite you to read more on this dedicated page: Pickled Asparagus (3 Ways!)

Label each bag or container with the date and store them in the freezer. Frozen asparagus can be stored for up to 12 months.
Taking the time to properly label and store your asparagus in the freezer is a smart and convenient way to enjoy its fresh flavor all year round. Once you’ve prepared your asparagus by trimming and cutting it into bite-sized pieces, the next step is to ensure it stays in top-notch condition for an extended period.
Labeling for Convenience: Before placing the bags or containers in the freezer, be sure to label them with the date. This simple step might seem like a small detail, but it can make a significant difference when you’re searching for specific ingredients in the future. Knowing the date of freezing allows you to prioritize using older asparagus first, ensuring minimal food waste.
Freezing for Longevity: Frozen asparagus is incredibly versatile and can be stored for up to 12 months without compromising its quality. Freezing effectively halts the aging process, preserving the vibrant color and nutrients. When you’re ready to use your frozen asparagus, simply remove the desired portion from the freezer and thaw it in the refrigerator or a bowl of cold water. This makes it a convenient option for adding a burst of green goodness to soups, stir-fries, casseroles, and more, regardless of the season.
Furthermore, frozen asparagus is a valuable resource for busy weeknight dinners when time is of the essence. You can easily incorporate it into a variety of dishes without the need for time-consuming prep work, like washing, peeling, and trimming. Its tenderness and flavor remain intact, allowing you to whip up delicious and nutritious meals in no time.
By labeling and freezing your asparagus, you’re not only extending its shelf life but also opening up a world of culinary possibilities throughout the year. Whether you’re preparing a quick family dinner, experimenting with new recipes, or simply craving the taste of fresh asparagus in the off-season, your labeled and well-organized freezer will be a treasure trove of convenience and inspiration.
Don’t stop here; you can continue your exploration by following this link for more details: Preserving spring asparagus – MSU Extension

Canning asparagus involves preserving it in a sealed jar, typically with a pressure canner to ensure safety. Here’s a basic guide to canning asparagus:
Canning asparagus is a time-honored method of preserving this vibrant green vegetable, allowing you to enjoy its goodness long after the growing season has passed. To embark on this culinary adventure, consider this comprehensive guide to canning asparagus:
Harvest at the Peak: The journey of canning asparagus begins with a bountiful harvest. Choose asparagus spears that are at their prime, typically when they are 6-8 inches tall and still tender. Harvesting in the morning when the spears are crisp and cool ensures the best quality.
Preparation and Cleaning: Once you’ve gathered your asparagus, give them a gentle rinse to remove any dirt or debris. Carefully trim the woody ends, ensuring that you retain the tender part of the spears. It’s crucial to work with clean and well-trimmed asparagus for the best results.
Selecting Jars: Choose canning jars that are specifically designed for home canning. These jars are made to withstand the heat and pressure of the canning process. Ensure that the jars and their seals are in excellent condition, with no chips or cracks.
Blanching: To maintain the vibrant color and quality of the asparagus, blanch the spears briefly in boiling water for about 2-3 minutes. This step helps preserve the asparagus’s crisp texture and removes any potential surface contaminants.
Prepare the Brine: In canning, the brine is a key element. It’s typically a mixture of water, vinegar, and salt. The brine not only adds flavor but also helps preserve the asparagus. You can customize the brine with additional seasonings like garlic, dill, or red pepper flakes for extra flavor.
Pack the Jars: Gently pack the blanched asparagus spears into the prepared canning jars, ensuring that they are snug but not overly compressed. Leave a little space at the top of each jar to accommodate the brine.
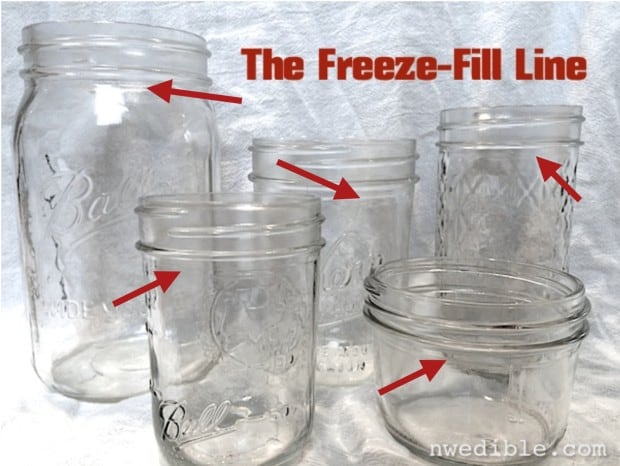
Fill with Brine: Pour the prepared brine into the jars, ensuring that the asparagus is fully covered. Leave about half an inch of headspace at the top of the jar. This space allows for proper sealing and expansion during the canning process.
Sealing and Processing: Place canning lids and rings onto the jars, following the manufacturer’s instructions for proper sealing. Then, use a pressure canner to process the jars. The pressure canner ensures that the asparagus is safely preserved by reaching the necessary high temperature. Follow the recommended processing time and pressure for your altitude.
Cooling and Storage: After the canning process is complete, carefully remove the jars from the pressure canner and place them on a clean, dry towel. As the jars cool, you’ll hear the satisfying “pop” of the lids sealing. Once cooled, check that the lids are concave, indicating a successful seal. Store the sealed jars in a cool, dark, and dry place.
Enjoy the Fruits of Your Labor: Canned asparagus can be a delightful addition to a variety of dishes, from salads to soups to stir-fries. Its preserved freshness and flavor will remind you of the joys of summer, even in the depths of winter.
Canning asparagus is a rewarding endeavor that allows you to capture the essence of this seasonal delight for year-round enjoyment. With the proper techniques and attention to detail, you can savor the taste of home-canned asparagus whenever your taste buds desire.
You can also read more about this here: Asparagus: Canning, Freezing, Pickling
Wash and trim the asparagus, cutting it into lengths that fit within your canning jars.
Preparing asparagus for canning is a straightforward but crucial step in preserving its fresh flavor and crisp texture. To embark on this journey of preserving the vibrant green goodness of asparagus, start by giving it the care and attention it deserves.
The First Step: Washing: Begin by gently washing the asparagus spears under cool, running water. This step serves two essential purposes: it removes any surface dirt and ensures that the asparagus is clean and ready for preservation. Pat them dry with a clean kitchen towel or paper towels to prevent excess moisture, which can affect the quality of the final product.
Trimming for Consistency: The next step is to trim the asparagus to fit perfectly within your canning jars. While asparagus comes in various sizes, it’s crucial to ensure uniform lengths for even cooking and preservation. To do this, line up the spears and carefully trim the tough, woody ends, usually about an inch or so from the base. This not only ensures that the asparagus fits neatly within the jars but also removes any less tender portions, enhancing the overall quality of your canned asparagus.
Choosing the Right Jar Size: The size of the jar matters. Select jars that can comfortably accommodate the trimmed asparagus, leaving adequate headspace at the top. Proper headspace allows for the expansion of contents during canning and creates a seal that prevents spoilage.
The Art of Packing: When placing the trimmed asparagus into the jars, take care to pack them snugly but not too tightly. This ensures that they maintain their shape and don’t become mushy during the canning process. You can arrange them vertically with the tips pointing up, creating a visually appealing display that’s also practical for even cooking.
The Preservation Process Awaits: With your asparagus neatly trimmed and snugly packed into the jars, you’re now ready to embark on the preservation process. Whether you choose to pickle, pressure can, or water bath can your asparagus, the care and precision you’ve applied during this initial step set the stage for a successful and flavorful outcome.
In the world of food preservation, attention to detail is paramount. By washing, trimming, and packing your asparagus with care, you’re not just preserving a vegetable; you’re capturing the essence of its freshness and flavor to enjoy throughout the year. These thoughtful steps ensure that each jar of canned asparagus is a testament to your dedication to preserving the bounties of the season for future culinary delights.
For additional details, consider exploring the related content available here Preserving spring asparagus – MSU Extension

Place the canning jars and lids in a large pot of water and bring it to a simmer. Simmer for about 10 minutes to sterilize them. Keep the jars warm until you’re ready to use them.
Ensuring the sterilization of your canning jars and lids is a crucial step in the canning process, one that guarantees the long-term preservation of your precious homemade creations. Here’s why this meticulous attention to cleanliness matters:
1. Preventing Spoilage: Sterilizing canning jars and lids eliminates any potential bacteria or microorganisms that might be present. These unwanted guests can spoil your preserves, leading to off-flavors, spoilage, or even dangerous botulism if not properly eradicated. By simmering the jars and lids, you create a bacteria-free environment that extends the shelf life of your canned goods.
2. A Blank Canvas: Sterile jars provide a clean slate for your preserved foods. Without any lingering residues or contaminants, your jams, pickles, or sauces can shine with their true flavors, colors, and textures. The absence of unwanted microorganisms allows the natural characteristics of your ingredients to shine through.
3. A Secure Seal: Clean jars and lids are essential for achieving a proper seal. When you fill a sterilized jar with your hot preserves and seal it with a sterilized lid, a vacuum is created as the contents cool. This vacuum seal not only locks in freshness but also acts as a visual indicator that your preserving process has been successful.
4. Peace of Mind: Knowing that your canning jars are sterile provides peace of mind when it comes to food safety. Whether you’re preserving the harvest from your garden or making homemade gifts for loved ones, the confidence that your canned goods are free from contaminants is priceless.
5. Storage Readiness: Keeping the sterilized jars warm until you’re ready to use them is another critical detail. Warm jars are less likely to crack when filled with hot preserves, preventing potential mishaps and preserving your hard work. This practice also helps maintain the temperature of your preserves, ensuring that they stay hot during the canning process, which is important for achieving a proper seal.
In essence, sterilizing canning jars and lids isn’t just a matter of food safety; it’s a testament to your commitment to preserving the integrity and flavor of your homemade creations. By following this essential step, you’re not only protecting your cherished recipes but also setting the stage for months or even years of culinary enjoyment from your well-preserved treasures.
Looking for more insights? You’ll find them right here in our extended coverage: From Pickles to Preserves: How to Save Your Vegetable Harvest
Pack the trimmed asparagus tightly into the sterilized jars, leaving about 1-inch of headspace at the top.
As you embark on the journey of preserving asparagus, the proper packing technique is crucial to ensure both safety and flavor retention. Here’s an extended insight into why packing the trimmed asparagus tightly into sterilized jars with the right headspace matters:
Optimal Preservation: The act of tightly packing the trimmed asparagus into the sterilized jars serves a vital purpose in preserving their quality. By minimizing the empty space within the jar, you reduce the amount of oxygen present. This, in turn, helps to prevent oxidation and maintain the vibrant green color, crisp texture, and fresh flavor of the asparagus throughout its storage.
Headroom for Safety: Leaving approximately 1-inch of headspace at the top of each jar is a crucial safety measure when canning asparagus. This space allows for the expansion of contents during the canning process and creates a vacuum seal as the jar cools. This hermetic seal is essential in preventing the growth of harmful microorganisms and ensuring the long-term safety of the preserved asparagus.
Consistent Quality: Consistency is key when it comes to preserving asparagus. By tightly packing the spears and maintaining the recommended headspace, you create a uniform environment within each jar. This uniformity ensures that all asparagus pieces receive equal heat distribution during processing, leading to consistent quality across your preserved batch.
Efficient Use of Space: Tightly packed jars not only enhance preservation but also make efficient use of storage space. You can maximize your pantry or storage area by minimizing wasted space between the asparagus spears. This organization allows for easier access and inventory management when you’re ready to enjoy your preserved asparagus.
Aesthetics and Presentation: Beyond the practical benefits, tightly packed jars of preserved asparagus are visually appealing. The neatly aligned spears create an enticing display that’s both satisfying to behold and delightful to share with others. Presentation can enhance the overall culinary experience, whether you’re serving preserved asparagus at home or gifting it to friends and family.
Long-Lasting Enjoyment: Properly packed and sealed jars of preserved asparagus can be stored for an extended period, allowing you to enjoy the delightful taste of this vegetable long after its growing season. This extended enjoyment is a testament to the art of food preservation, which empowers you to savor seasonal flavors year-round.
In summary, the meticulous process of packing trimmed asparagus tightly into sterilized jars with the appropriate headspace is a crucial step in the art of preservation. It safeguards the asparagus’s flavor, texture, and safety while optimizing storage efficiency and presentation. Whether you’re preserving the harvest from your garden or savoring the work of artisans, this practice ensures that every jar of preserved asparagus offers a taste of excellence and the joy of a well-preserved tradition.
Looking for more insights? You’ll find them right here in our extended coverage: Canning Asparagus
If desired, you can add a hot brine solution made from water, vinegar, and pickling salt (for flavor) to the jars, covering the asparagus.
The addition of a well-crafted brine solution can elevate your canned asparagus, infusing it with a delightful blend of flavors. Here’s a deeper exploration of the brine solution and its role in preserving asparagus:
1. Flavor Enhancement: The brine serves as more than just a preservation medium; it’s an opportunity to enhance the taste of your canned asparagus. While basic brines consist of water, vinegar, and pickling salt, you can customize it with various aromatic ingredients to impart unique flavors. Consider adding elements like garlic cloves, peppercorns, mustard seeds, dill sprigs, or red pepper flakes for a touch of complexity.
2. Vinegar Choice: The choice of vinegar plays a crucial role in the overall flavor profile of your canned asparagus. While white vinegar is a common choice for its neutral taste, you can experiment with different types like apple cider vinegar or white wine vinegar to introduce subtle variations in acidity and flavor. Each type of vinegar can lend its distinct character to the finished product.
3. Balancing Sweetness: Some brine recipes include sugar to balance the acidity of the vinegar and enhance the overall taste. The addition of sugar can provide a touch of sweetness that complements the savory notes of the asparagus. Adjust the sugar content to your preference, keeping in mind that it should enhance the flavor without making the asparagus overly sweet.
4. Salt for Preservation and Flavor: Pickling salt, a pure and additive-free salt, is commonly used in brine solutions for preserving vegetables. It not only aids in preservation but also contributes to the overall flavor of the canned asparagus. The saltiness of the brine should be balanced to enhance the natural taste of the asparagus without overwhelming it.
5. Creative Experimentation: Canning is a culinary adventure, and the brine solution offers ample room for creativity. Feel free to experiment with different combinations of herbs, spices, and aromatics to craft a brine that suits your taste preferences. Over time, you can develop your signature brine recipe that transforms your canned asparagus into a unique and delectable treat.
6. Safety Considerations: While experimenting with flavors is encouraged, it’s essential to maintain safe canning practices. Be sure to follow reputable canning recipes and guidelines to ensure the safety of your preserved asparagus. Proper sterilization, processing times, and techniques are critical to prevent foodborne illnesses.
In summary, the brine solution is not merely a preserving agent but also a canvas for culinary creativity when canning asparagus. With the right combination of vinegar, salt, sugar, and aromatic ingredients, you can enhance the natural flavors of the asparagus and create a unique and flavorful addition to your pantry. Don’t hesitate to explore different brine variations to find the perfect complement to your canned asparagus.
For a comprehensive look at this subject, we invite you to read more on this dedicated page: Michigan Fresh: Using, Storing, and Preserving Asparagus (HNI28 …

Wipe the jar rims clean, place the lids and bands on, and tighten them.
The final steps in the art of canning involve those critical finishing touches that ensure your preserved treasures remain safe and flavorsome until the day you decide to savor them.
Wiping the Jar Rims Clean: After filling each jar with your delectable creation, it’s essential to take a moment to wipe the rims clean. This seemingly small act is of utmost importance because it helps create a proper seal. Any food residue or liquid left on the rim can compromise the seal’s integrity, allowing air and potential contaminants to enter the jar over time. By keeping those rims pristine, you’re ensuring that your preserved goods stay as fresh as the moment they were canned.
Placing the Lids: Once the rims are impeccably clean, it’s time to place the lids. These specialized canning lids are designed to create an airtight seal when properly applied. Gently center each lid on the jar, ensuring it sits evenly without any tilting or skewing. The presence of any food particles or excessive moisture on the rim could prevent a secure seal, so the clean rims from the previous step are crucial here.
Tightening the Bands: The bands, also known as screw bands or screw-on rings, are the final layer of protection for your preserved delights. They secure the lids in place during the canning process and help maintain the seal afterward. When attaching the bands, be sure not to overtighten them. The goal is to secure the lids firmly but not to the point where they become too tight to release air during the canning process. A fingertip-tight seal is ideal – tight enough to keep the lids in place but not so tight that it compromises the seal’s effectiveness.
These seemingly simple yet crucial steps are the culmination of your canning efforts, ensuring that your home-preserved foods remain safe and delicious for an extended period. With care and attention to detail during these final stages, you’ll be rewarded with the satisfying “pop” of a sealed jar and the knowledge that your culinary creations are ready to be enjoyed whenever you decide to savor a taste of the past season’s bounty.
Should you desire more in-depth information, it’s available for your perusal on this page: Asparagus: Canning, Freezing, Pickling

Follow your pressure canner’s instructions to process the jars at the recommended pressure and time based on your altitude. Typically, this process takes 20-25 minutes.
When it comes to preserving asparagus through canning, following your pressure canner’s instructions is a crucial step to ensure the safety and quality of your canned goods. The pressure canning process is a reliable method for extending the shelf life of asparagus while retaining its flavor and nutrients. Here’s a more detailed guide on how to pressure can asparagus:
Prepare Your Asparagus: Begin by selecting fresh, tender asparagus spears. Wash them thoroughly under cold running water and trim the tough, woody ends. You can cut them into uniform lengths to fit your canning jars, leaving about an inch of headspace at the top.
Sterilize Jars and Lids: Properly clean and sterilize canning jars, lids, and bands by either using a dishwasher’s sterilization cycle or immersing them in boiling water for a few minutes. Keep the jars warm until you’re ready to fill them.
Pack the Jars: Pack the trimmed asparagus spears tightly into the sterilized jars, ensuring they are vertical and not overcrowded. You can add a bit of flavor by including seasonings like garlic cloves, dill, or a pinch of red pepper flakes if desired.
Prepare the Brine (Optional): While asparagus can be pressure canned without a brine, some prefer to enhance the flavor by pouring a hot brine over the spears before sealing the jars. A simple brine can consist of water, vinegar, and salt, or you can experiment with your favorite pickling spices for added zest.
Wipe Jar Rims and Seal: After filling the jars (with or without brine), use a clean, damp cloth to wipe the rims to ensure there’s no debris that could interfere with sealing. Place sterilized canning lids on the jars and secure them with the bands, ensuring they are finger-tight (not too loose or too tight).
Load the Canner: Follow your pressure canner’s instructions for adding water to the canner. Typically, you’ll add several inches of water to the bottom. Place the filled and sealed jars on the canner’s rack, ensuring there’s enough water to cover the jars by at least an inch.
Process at the Recommended Pressure: Consult your pressure canner’s manual for guidance on the recommended pressure and processing time based on your altitude. The pressure canning process typically takes about 20-25 minutes, but this can vary depending on your location’s altitude. The pressure and time are carefully calculated to ensure that harmful bacteria and microorganisms are eliminated.
Cool and Store: After the recommended processing time, turn off the heat, and allow the pressure canner to cool naturally. Once it’s safe to open, carefully remove the jars and place them on a towel or cooling rack. You’ll likely hear the satisfying “ping” of the lids sealing as they cool.
Check Seals and Store: After 24 hours, check the seals by pressing the center of the lids. If they don’t flex, the jars are sealed properly. Store the sealed jars in a cool, dark, and dry place. Properly sealed jars can last for up to a year or more.
By following these steps and your pressure canner’s specific instructions, you can confidently preserve the delicious flavor and nutritional goodness of asparagus, ensuring that it’s readily available for your culinary creations throughout the year. Pressure canning provides a safe and effective way to enjoy the bounty of asparagus well beyond its limited growing season, allowing you to savor its goodness in a variety of dishes, from soups to stir-fries and beyond.
Don’t stop here; you can continue your exploration by following this link for more details: Pickled Asparagus (3 Ways!)
Once the jars are safely canned and sealed, allow them to cool completely before storing them in a cool, dark place. Canned asparagus can last up to a year or more.
“After the final step of the canning process, where the jars are securely sealed, it’s time to exercise a little patience as you allow them to cool and prepare for their rest in storage. Here’s what you need to know about this crucial phase in preserving your asparagus:
The Cooling Process: Once the canning jars are removed from the hot water bath or pressure canner, they should be placed on a clean, dry towel or cooling rack. It’s important not to rush this step. Allowing the jars to cool naturally at room temperature is essential for achieving a proper seal and preventing potential spoilage.
Check the Seals: As the jars cool, you might hear a satisfying “ping” or “pop” sound. This is a reassuring sign that the jars are sealing correctly. However, it’s not the only indicator. After the jars have cooled for about 12 to 24 hours, carefully inspect each one. Press down on the center of the lid; if it doesn’t flex or make a popping sound when pressed, the jar has a good seal. If a jar doesn’t seal properly, it should be refrigerated and consumed promptly.
Storage Conditions: Once you’re confident that all your jars have sealed correctly, it’s time to find them a cozy home. Store the canned asparagus in a cool, dark place. A pantry or cellar is ideal, as long as the temperature remains relatively stable and doesn’t fluctuate too much. Avoid storing jars near sources of heat or in direct sunlight, as this can compromise their quality over time.
Shelf Life: Canned asparagus, when stored under the right conditions, can last for up to a year or even longer. While the asparagus remains safe to eat beyond this timeframe, its quality may gradually deteriorate, with potential changes in texture and flavor. Therefore, it’s recommended to consume canned asparagus within a year for the best taste and texture.
Labeling: To keep track of your canned goods, it’s a good practice to label each jar with the date of canning. This ensures that you use the oldest jars first, maintaining a rotation that prevents any jars from sitting on the shelf for too long.
Safety First: Always adhere to safe canning practices and follow approved recipes and guidelines. Proper sealing and storage are essential for preventing the growth of harmful bacteria that can lead to foodborne illnesses.
Canning asparagus is a rewarding endeavor that allows you to enjoy this seasonal delight throughout the year. By patiently allowing the jars to cool, conducting seal checks, and storing them in suitable conditions, you’re ensuring that your home-canned asparagus maintains its quality and safety for months to come. Each jar holds the promise of a delicious and convenient addition to your meals, providing a taste of the harvest season whenever you desire.”
If you’d like to dive deeper into this subject, there’s more to discover on this page: Pickled Asparagus (3 Ways!)
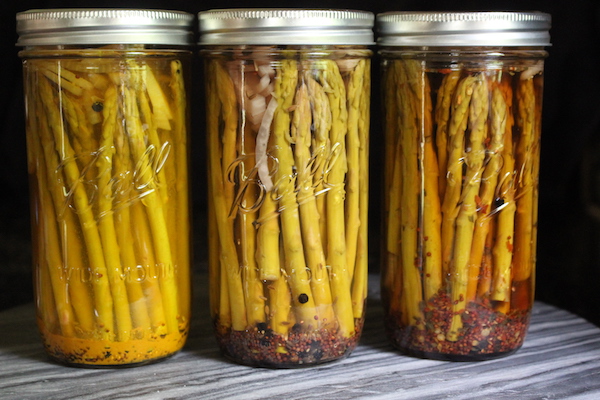
Pickling is a delightful way to preserve asparagus while infusing it with tangy and zesty flavors. Here’s a simple pickling recipe for asparagus:
Pickling asparagus is a delightful culinary journey that not only preserves its seasonal goodness but also transforms it into a tangy and zesty delicacy. This simple pickling recipe for asparagus is a gateway to savoring its unique flavor long after the growing season has passed.
Ingredients You’ll Need:
- Fresh asparagus spears, trimmed to fit your jars.
- White vinegar for a crisp, clean taste.
- Water to balance the acidity of the vinegar.
- Salt for seasoning and preservation.
- Sugar to add a touch of sweetness.
- Garlic cloves for an aromatic infusion.
- Whole black peppercorns for a hint of spice.
- Fresh dill or dill seeds for that classic pickle flavor.
- Optional: Red pepper flakes for a touch of heat.
The Steps:
Prepare the Asparagus: Trim the asparagus spears to fit snugly into your sterilized jars. Make sure they stand about an inch below the jar’s rim.
Create the Pickling Brine: In a saucepan, combine equal parts white vinegar and water. Add salt and sugar to taste, depending on your preference. A common ratio is 2 cups vinegar, 2 cups water, 1 tablespoon salt, and 1 tablespoon sugar. Bring this mixture to a gentle boil, ensuring that the salt and sugar completely dissolve.
Pack the Jars: While the brine is heating, pack your sterilized jars with the trimmed asparagus spears. Add peeled garlic cloves, black peppercorns, dill, and a pinch of red pepper flakes if you like some heat.
Pour the Hot Brine: Carefully pour the hot pickling brine over the asparagus in each jar, ensuring that it covers the spears completely. Leave a bit of space at the top to allow for expansion.
Seal and Store: Seal the jars with sterilized lids while the mixture is still hot. As the jars cool, you may hear the satisfying pop of a vacuum seal. This indicates that your pickled asparagus is well-preserved and ready to store.
Wait Patiently: Allow the pickled asparagus to cool to room temperature before transferring it to the refrigerator. The flavors will continue to meld and develop over time. For the best taste, wait at least a week before indulging in your homemade pickled asparagus. It’s worth the wait.
Enjoy the Zesty Goodness: Once your pickled asparagus is ready, you’ll have a versatile treat on hand. Enjoy it straight from the jar as a crunchy snack, slice it into salads for a burst of flavor, or use it as a garnish for cocktails and appetizers. Its tangy, zesty notes will elevate any dish it touches.
So, with this straightforward pickling recipe, you can embark on a flavorful journey that extends the enjoyment of asparagus throughout the year. Pickled asparagus isn’t just a preservation method; it’s a culinary adventure waiting to unfold on your taste buds.
Looking for more insights? You’ll find them right here in our extended coverage: Pickled Asparagus (3 Ways!)
Wash and trim the asparagus to fit your canning jars, leaving about 1/2 inch of headspace.
When preparing asparagus for canning, attention to detail is key to preserving their quality and flavor for an extended period. Here’s a more comprehensive look at the steps involved in preparing asparagus for canning, from washing and trimming to the critical aspect of leaving adequate headspace:
Selecting Fresh Asparagus: Begin with selecting the freshest asparagus possible. Look for firm, crisp spears with tightly closed tips. This ensures that the asparagus you can will be of the highest quality.
Washing for Cleanliness: Rinse the asparagus thoroughly under cool, running water. This step removes any dirt or debris that may be clinging to the spears. Gently pat them dry with a clean kitchen towel or paper towels.
Trimming for Uniformity: Trim the tough, woody ends from the asparagus spears. The woody ends can be tough to chew and may not can well. A handy tip is to hold a spear at both ends and bend it; it will naturally snap where the tender part begins. You can then use this snapped spear as a guide to trim the rest.
Sizing for Jars: As you mentioned, it’s crucial to trim the asparagus to fit your canning jars. Depending on the jar size you’re using, cut the spears to the appropriate length. Leave about 1/2 inch of headspace at the top of each jar to allow for expansion during the canning process. This headspace helps create a proper vacuum seal.
Blanching for Quality: Before packing the asparagus into jars, blanch them briefly in boiling water. This step not only partially cooks the asparagus but also helps maintain their color, flavor, and texture during storage. After blanching, immediately transfer the asparagus to an ice water bath to stop the cooking process, as mentioned earlier.
Packing into Jars: Carefully pack the blanched asparagus spears into the prepared canning jars. You can arrange them either vertically or horizontally, depending on your preference and the jar size. Be gentle to avoid bruising or breaking the spears.
Adding Liquid: Depending on your canning recipe, you may need to add a liquid such as a brine, vinegar, or water to the jars. This liquid helps preserve the asparagus and adds flavor. Be sure to follow your canning recipe’s guidelines for the correct liquid and quantity.
Removing Air Bubbles: After filling the jars, use a canning tool or a non-metallic utensil to remove any air bubbles trapped within the jars. Air pockets can interfere with the sealing process and affect the quality of your canned asparagus.
Adjusting Headroom: Check and adjust the headspace as needed. It should be consistent across all jars to ensure a proper seal. Add more liquid if necessary, ensuring that 1/2 inch of headspace is maintained.
Sealing and Processing: Seal the jars with sterilized lids and rings, following the manufacturer’s instructions. Process the jars in a boiling water bath or pressure canner, as specified in your canning recipe. This step completes the preservation process and ensures that the asparagus are safe for long-term storage.
By meticulously following these steps, you can confidently prepare and can asparagus to enjoy the fresh, crisp taste of this delightful vegetable throughout the year. Proper preparation and attention to detail are essential for successful canning and maintaining the quality of your asparagus.
If you’d like to dive deeper into this subject, there’s more to discover on this page: How to Freeze and Preserve Asparagus
In a saucepan, combine equal parts white vinegar and water. Add pickling salt, sugar, and any desired spices, garlic, or dill sprigs. Bring the brine to a boil and let it simmer for a few minutes.
Creating a flavorful and balanced brine is an essential skill for pickling enthusiasts. The art of pickling lies not only in preserving vegetables but also in infusing them with a harmonious blend of flavors. Here’s how to take your pickling brine to the next level:
The Right Vinegar: Start with the vinegar, which forms the backbone of your brine. While white vinegar is a classic choice, you can experiment with various types of vinegar to impart unique flavors to your pickles. Apple cider vinegar adds a subtle fruity note, while white wine or champagne vinegar lends a touch of elegance. For a bolder flavor, consider malt vinegar or even rice vinegar for a hint of sweetness.
Balancing Act: Achieving the perfect balance of flavors is essential. Combine the tanginess of vinegar with the sweetness of sugar and the savory depth of pickling salt. The exact ratio will depend on your personal preference and the recipe, but a common guideline is to use equal parts vinegar and water, with sugar and salt to taste. Remember that salt not only enhances flavor but also acts as a preservative.
Spice It Up: The beauty of pickling is in the versatility of spices. Feel free to get creative and tailor your brine to match your desired flavor profile. Common additions include black peppercorns, mustard seeds, coriander seeds, and red pepper flakes for a hint of heat. Garlic cloves and dill sprigs are classic choices that impart a robust and aromatic quality to your pickles. Experiment with different combinations to discover your signature flavor.
Bringing It to Life: In a saucepan, combine the vinegar, water, sugar, pickling salt, and your chosen spices, garlic, or herbs. As you heat the mixture, the flavors meld together, infusing the brine with complexity. Allow the brine to simmer for a few minutes to ensure that the sugar and salt fully dissolve and that the spices release their essence. This simmering also sterilizes the brine, which is crucial for safe pickling.
Cooling Down: After simmering, let the brine cool completely before pouring it over your prepared vegetables. Cooling not only prevents the vegetables from becoming mushy but also helps maintain their crisp texture.
Customization: Remember that pickling is an art, and there are no hard and fast rules. As you gain experience, you can adjust the brine’s flavor components to suit your taste. Some may prefer a sweeter brine, while others lean toward a more pungent and spicy profile. The beauty of pickling lies in its ability to adapt to your culinary creativity.
Beyond Vegetables: While brines are most commonly associated with pickling vegetables, don’t limit yourself. Brines can elevate the flavor of meats, poultry, and even fruits. The principles of balance, customization, and sterilization apply just as effectively to these culinary experiments.
In essence, creating the perfect pickling brine is a delicate interplay of flavors and ingredients. With the right vinegar, a balanced blend of sugar and salt, a medley of spices, and careful simmering, you can craft brines that transform ordinary vegetables into delectable pickles bursting with personality. As you explore and experiment, you’ll discover a world of pickling possibilities waiting to be explored in your own kitchen.
Don’t stop here; you can continue your exploration by following this link for more details: Crunchy Pickled Fiddlehead Ferns Recipe – Forager | Chef
Place the trimmed asparagus spears into sterilized canning jars, adding any desired spices, garlic, or dill sprigs.
Creating homemade pickled asparagus is a delightful culinary adventure that not only preserves the freshness of this seasonal delight but also infuses it with a symphony of flavors. Once you’ve taken the crucial step of trimming your asparagus spears, the journey to crafting delicious pickled asparagus begins. Here’s how to proceed:
Sterilized Canning Jars: The foundation of successful pickling is cleanliness. Ensure your canning jars are thoroughly sterilized to create an environment where the pickling process can take place without any unwanted interference. You can achieve this by washing the jars in hot, soapy water and then either boiling them for 10 minutes or running them through a dishwasher cycle with a sanitize setting.
Infusing Flavors: The magic of pickling lies in the flavorful concoction of spices and aromatics. Before placing your trimmed asparagus spears in the sterilized jars, consider what flavors you’d like to infuse. Common choices include garlic cloves, dill sprigs, peppercorns, and red pepper flakes for a touch of heat. Feel free to get creative and experiment with different spices and herbs to tailor the pickled asparagus to your palate.
Layering with Care: As you add the spices and aromatics to the jars, do so with care and intention. The placement of these ingredients can affect the overall flavor profile of your pickled asparagus. For example, adding the garlic cloves at the bottom of the jar can result in a stronger garlic infusion, while placing dill sprigs at the top can provide a milder dill flavor. Layer the asparagus spears and spices thoughtfully to achieve your desired taste.
Brine and Processing: Once your asparagus spears and flavorings are snugly nestled in the jars, it’s time to prepare the brine. This typically consists of a mixture of vinegar, water, salt, and sugar. The brine serves as both a preservative and a flavor enhancer. Pour the brine into the jars, ensuring that the asparagus is fully submerged. Seal the jars with sterile lids and bands.
Pickling Time: Patience is key in the pickling process. Allow the jars to cool to room temperature and then transfer them to the refrigerator. The asparagus will need time to pickle and absorb the flavors. Depending on your taste preferences, you can start sampling your pickled asparagus after about a week. The longer they sit, the more pronounced the flavors will become.
Versatile Culinary Creations: Once your pickled asparagus is ready, you’ll have a delightful addition to salads, charcuterie boards, Bloody Marys, or simply as a tangy snack. The beauty of homemade pickling is that you have complete control over the ingredients and flavors, allowing you to craft a culinary masterpiece that’s uniquely yours.
So, with sterilized jars and a creative selection of spices, you’re ready to embark on a pickling journey that will not only extend the enjoyment of your asparagus but also elevate your culinary repertoire.
To expand your knowledge on this subject, make sure to read on at this location: Pickled Asparagus (3 Ways!)

Pour the hot brine over the asparagus in each jar, leaving 1/2 inch of headspace.
The process of preserving asparagus through canning is a culinary art, and achieving that perfect balance between the hot brine and the asparagus is essential for successful canning. Here’s a closer look at why pouring the hot brine with a precise 1/2-inch headspace is a critical step in this preservation process:
Sealing Perfection: The 1/2-inch headspace is not just a random measurement; it’s a precise requirement for achieving a reliable and secure seal. This space at the top of the jar ensures that there’s adequate room for the asparagus and the brine to interact during the canning process without risking spillage or contamination.
Proper Expansion Allowance: During the canning process, both the asparagus and the liquid inside the jar heat up and expand. Without the 1/2-inch headspace, there’s a risk of the contents pushing against the lid, potentially compromising the seal. The headspace acts as a buffer, preventing excess pressure inside the jar.
Minimizing Air Pockets: The headspace also plays a role in minimizing the presence of air pockets in the jar. Air pockets can be problematic because they may lead to uneven heat distribution during processing, which can affect the quality and safety of the preserved asparagus.
Preventing Contamination: Ensuring the proper headspace is essential for preventing any brine from overflowing onto the jar’s rim during processing. A clean, residue-free rim is crucial for achieving a strong seal and preventing contaminants from entering the jar.
Safe Canning: Achieving the correct headspace is particularly important when using a pressure canner, which relies on precise pressure and temperature control to ensure the safety of preserved foods. A consistent headspace contributes to uniform heat distribution and a reliable canning outcome.
Quality Preservation: Maintaining the 1/2-inch headspace helps preserve the quality of the asparagus. It ensures that the spears are adequately covered by the brine, promoting even preservation and flavor infusion while preventing the asparagus from sticking together or becoming overly submerged.
Visual Verification: The 1/2-inch headspace also allows for easy visual verification of a successful seal once the canning process is complete. A concave lid indicates that the jar has sealed properly, giving you confidence in the safety and quality of your preserved asparagus.
Flavor Distribution: The headspace ensures that the asparagus maintains its distinct flavor and texture. With just the right amount of brine, the asparagus can absorb the flavors of the preserving liquid without becoming overly saturated.
In essence, the 1/2-inch headspace is like the conductor’s baton in an orchestra of canning, orchestrating a harmonious and safe preservation process. It’s a small yet crucial detail that ensures that your canned asparagus is not only delicious but also safely and beautifully preserved, ready to enhance your culinary creations whenever you decide to savor it.
You can also read more about this here: From Pickles to Preserves: How to Save Your Vegetable Harvest
Wipe the jar rims clean, place the lids and bands on, and tighten them.
The final steps in the process of canning asparagus are not to be overlooked, for they hold the key to a successful and safe preservation journey. After carefully preparing your asparagus and packing it into the jars, it’s time to seal the deal.
Ensuring a Clean Seal: To achieve a clean seal, first, wipe the rims of the canning jars meticulously. Any residue or particles on the jar rims can prevent a proper seal, leading to potential spoilage. Use a clean, damp cloth or paper towel to wipe away any stray bits of food, liquid, or oil.
Lids and Bands at the Ready: With the jar rims pristine, it’s time to introduce the stars of the sealing show: the lids and bands. Place the prepared canning lids onto the jars, ensuring that the sealing compound on the lids is aligned with the rim of the jar. The bands, which secure the lids in place during the canning process, should be threaded onto the jars’ threads.
Tightening with Care: When tightening the bands onto the jars, it’s crucial to exercise caution. The goal is not to over-tighten, which can lead to an improper seal, nor to leave them too loose, which could allow for air to enter the jar. Instead, aim for a “fingertip tight” seal—tight enough to secure the lid but with just enough give to allow for the release of excess air during the canning process.
Ready for Processing: With the lids and bands in place, your jars of asparagus are now ready for processing. Depending on the chosen canning method—whether it’s pressure canning or water bath canning—the jars will undergo a specific heat treatment to ensure their safety and long-term preservation.
The Culmination of Care: These seemingly minor steps—wiping the rims, placing the lids and bands, and tightening them—are the culmination of the care and precision you’ve applied throughout the canning process. They are the final acts in sealing the essence of freshly harvested asparagus within those jars, preserving their flavor and nutrients for the seasons to come.
Properly sealed and preserved, your asparagus will be ready to grace your table whenever you desire a taste of the season’s bounty. These jars, neatly sealed and adorned with care, hold not just asparagus but the promise of delicious meals and culinary delights throughout the year, a testament to your dedication to preserving nature’s gifts.
Explore this link for a more extensive examination of the topic: Michigan Fresh: Using, Storing, and Preserving Asparagus (HNI28 …

Process the jars in a boiling water bath for about 10-15 minutes. Afterward, allow the jars to cool to room temperature.
The final stages of the canning process are pivotal in sealing the fate of your homemade preserves, ensuring their safety and long-term deliciousness. Processing the jars in a boiling water bath and then patiently allowing them to cool are the culminating steps that complete the transformation of fresh ingredients into shelf-stable delights. Here’s why these actions are essential:
1. Ensuring Food Safety: Processing the jars in a boiling water bath serves a dual purpose. It not only destroys any remaining bacteria, yeast, or molds but also creates a vacuum seal that locks out potential contaminants. This double layer of protection significantly reduces the risk of spoilage or foodborne illness.
2. Sealing the Deal: The boiling water bath process is what makes your preserves shelf-stable. As the jars heat up and their contents reach the boiling point, any air trapped within the jars is forced out. When the jars cool, a vacuum seal forms as the contents contract. This seal is the hallmark of successful canning, signifying that your preserves are airtight and safe for long-term storage.
3. Preserving Freshness: The boiling water bath helps maintain the quality of your preserved foods. By destroying enzymes and microorganisms that can cause spoilage or texture changes, it locks in the freshness and flavor of your ingredients. When you open a jar months or even years later, you’ll still savor the taste of the harvest season.
4. Cooling for Stability: Allowing the processed jars to cool to room temperature is a crucial step in the sealing process. Rapid temperature changes can disrupt the integrity of the vacuum seal, potentially compromising the safety of your preserves. Patience is key here, as the gradual cooling ensures that the lids remain firmly sealed.
5. Visual Confirmation: As the jars cool, you’ll often hear the satisfying “ping” or “pop” of the lids as they seal. This audible confirmation provides peace of mind, assuring you that your canning efforts have been successful. However, it’s essential to double-check the seal visually by ensuring that the lids are concave and don’t flex when pressed in the center.
In conclusion, the boiling water bath and subsequent cooling period are the finishing touches that elevate your homemade preserves from mere recipes to long-lasting culinary treasures. These steps not only ensure the safety of your canned goods but also preserve their quality and flavor, allowing you to savor the taste of the season whenever you open a jar. Canning is a labor of love, and these final steps are the crowning moments that make it all worth it.
For additional details, consider exploring the related content available here Preserving spring asparagus – MSU Extension

Store the sealed and cooled jars in a cool, dark place for at least a few weeks to allow the flavors to meld. Pickled asparagus can be enjoyed for up to a year or more.
The process of preserving asparagus doesn’t end with sealing the jars; it continues as the flavors evolve and mature over time. Here’s an extended perspective on why storing the sealed and cooled jars in a cool, dark place for an extended period is essential for the development and long-term enjoyment of pickled asparagus:
Flavor Fusion: Patience is a virtue in the world of pickling. After sealing the jars, the pickled asparagus embarks on a journey of flavor fusion. The cool, dark storage environment provides an ideal setting for the various ingredients, from spices and herbs to the vinegar-based brine, to meld harmoniously. As weeks turn into months, these components intertwine, creating a balanced and nuanced taste that elevates the asparagus to culinary excellence.
Texture Transformation: While the flavors meld, the texture of the pickled asparagus undergoes a transformation. Initially, it may retain some of its crispness, but over time, it gradually softens, absorbing the flavors of the brine. This textural evolution adds another layer of complexity to each bite, making the asparagus a dynamic and delightful ingredient in various culinary creations.
Preservation Prowess: The extended storage period in a cool, dark place is a testament to the preservation prowess of pickling. It allows the asparagus to be enjoyed for an extended duration, typically up to a year or more, while maintaining its quality. This longevity is particularly valuable when you have an abundance of fresh asparagus during its peak season and want to savor its taste throughout the year.
Versatile Culinary Applications: Pickled asparagus, with its well-developed flavors and softened texture, becomes a versatile ingredient in the kitchen. As it matures in storage, it can be used in various dishes, from salads and appetizers to sandwiches and charcuterie boards. Its tangy, savory profile complements a wide range of culinary creations, adding a touch of gourmet flair to your meals.
Gourmet Gifting: Well-preserved pickled asparagus is not only a culinary delight but also a thoughtful gift. When stored for an extended period, it can be shared with friends and family during special occasions or as a token of appreciation. The flavors that have melded and matured in the jar make it a unique and memorable present.
Preserving Tradition: The practice of storing pickled asparagus for an extended period is a continuation of the time-honored tradition of food preservation. It connects you to the culinary heritage of preserving seasonal ingredients, ensuring that the flavors of the harvest are celebrated year-round.
In conclusion, the art of pickling asparagus is a testament to the culinary journey of flavor development and preservation. Storing the sealed and cooled jars in a cool, dark place for an extended period allows the flavors to meld, the texture to transform, and the asparagus to become a versatile and enduring ingredient. This practice not only celebrates the essence of preservation but also offers a taste of excellence that can be enjoyed for many months, making it a cherished tradition in the world of culinary preservation.
Additionally, you can find further information on this topic by visiting this page: Pickled Asparagus (3 Ways!)

Conclusion
These preservation techniques ensure that you can enjoy the delightful taste of asparagus throughout the year, even when it’s out of season. Whether you choose freezing, canning, or pickling, each method offers a unique way to extend the shelf life of this beloved vegetable while preserving its flavor, texture, and nutritional value. So, make the most of asparagus season and ensure that its delectable taste graces your table all year long.
Preserving asparagus isn’t just about extending its availability; it’s a way to capture the essence of its vibrant taste and nutritional value so that it can continue to grace your table, even when the fields are no longer yielding fresh spears. Here’s an extended look at the enduring benefits of these preservation techniques:
1. Seasonal Abundance, Year-Round Enjoyment: Asparagus enthusiasts eagerly anticipate its short-lived spring season. By mastering preservation methods like freezing, canning, and pickling, you can savor the essence of fresh asparagus throughout the year. These techniques allow you to relish its crisp texture and unique flavor regardless of the season, ensuring that this beloved vegetable remains a staple in your culinary repertoire.
2. Culinary Versatility: Preserved asparagus is incredibly versatile, making it a valuable addition to your pantry. Frozen asparagus can be incorporated into soups, stir-fries, and side dishes with ease. Canned asparagus, with its tender texture, is ready to elevate salads, quiches, and omelets. Pickled asparagus brings a burst of tangy goodness to charcuterie boards, sandwiches, and cocktails. The wide range of culinary applications makes preserved asparagus a valuable ingredient for creative cooking year-round.
3. Nutritional Benefits Preserved: One of the remarkable aspects of these preservation methods is their ability to retain the nutritional value of asparagus. Freezing, canning, and pickling techniques lock in essential vitamins and minerals, including folate, vitamin K, and antioxidants. When you consume preserved asparagus, you’re not just enjoying its taste; you’re also reaping the nutritional benefits that make it a healthy addition to your diet.
4. Sustainable Choices: Preserving asparagus offers an eco-friendly approach to reducing food waste. Instead of letting excess asparagus go to waste during the spring harvest, you can capture its goodness and minimize the environmental impact of discarded produce. By practicing preservation techniques, you contribute to sustainability and reduce the need for excessive agricultural production.
5. Culinary Exploration: Preservation methods open the door to culinary exploration and experimentation. You can customize brine solutions, try different seasonings, and adapt recipes to your taste. The journey of preserving asparagus becomes a creative endeavor, allowing you to craft unique flavors and discover personal preferences in the preservation process.
6. Tradition and Legacy: Preserving asparagus can be a tradition passed down through generations. Family recipes and preservation techniques carry the stories and memories of past seasons, connecting you to culinary traditions that have stood the test of time. These preserved delicacies can become heirlooms cherished by your loved ones in the years to come.
In essence, the art of preserving asparagus goes beyond practicality; it’s a celebration of seasonal abundance and a testament to the culinary possibilities that can be achieved with this versatile vegetable. Whether you’re freezing, canning, or pickling, each method extends the life of asparagus while preserving its essence, ensuring that its delightful taste continues to grace your table year after year. So, embrace the opportunity to savor asparagus in all its preserved glory and relish the joys of this enduring culinary tradition.
Looking for more insights? You’ll find them right here in our extended coverage: Dietary Plant Polyphenols: Effects of Food Processing on Their …
More links
For a comprehensive look at this subject, we invite you to read more on this dedicated page: How to Freeze and Preserve Asparagus