
Table of Contents
Your bedroom is your personal sanctuary and it deserves to be a space that reflects your style and personality. While redecorating or upgrading your bedroom can be an exciting project, it doesn’t have to break the bank. DIY bedroom projects offer a creative and budget-friendly way to transform your space into a stylish haven. In this article, we’ll explore a variety of DIY ideas that will breathe new life into your bedroom without draining your wallet.
Your bedroom is a reflection of your innermost self, a place where you can unwind, rejuvenate and truly be yourself. The idea of redecorating or upgrading your bedroom might fill you with excitement, but it’s essential to remember that creating a space that speaks to your style and personality doesn’t have to be an expensive endeavor. Embracing DIY bedroom projects opens up a world of creative possibilities that not only breathe new life into your sanctuary but also keep your budget in check. Here, we’ll delve into a diverse range of DIY ideas that will infuse your bedroom with personality, style and charm without causing a dent in your finances.
1. Repurpose and Upcycle Furniture:
Before rushing out to buy new furniture, consider what you already have. A fresh coat of paint, new hardware or a creative reconfiguration can give your old furniture a stylish makeover. You might discover that a vintage dresser or a forgotten bookshelf can become a unique focal point in your redesigned bedroom.
2. Custom Wall Art:
Create your own wall art to add a personal touch to your space. Whether it’s painting, collage or even framing your favorite fabric or wallpaper, custom artwork can set the tone for your bedroom’s aesthetic. It’s a cost-effective way to decorate your walls with pieces that have sentimental value or tell your story.
3. DIY Headboard:
Crafting a custom headboard can transform the look of your bed and give your bedroom a cozy, luxurious feel. Materials like reclaimed wood, upholstered panels or even an arrangement of decorative pillows can serve as the basis for your DIY headboard project.
4. Personalized Bedding:
Customize your bedding with hand-painted or dyed designs, fabric markers or even tie-dye techniques. This allows you to tailor your bed linens to your color scheme and design preferences. Plus, it’s a fun and therapeutic DIY project.
5. Floating Shelves:
Install floating shelves to display your favorite books, decorative items or plants. Not only do they add a decorative element to your bedroom, but they also provide practical storage and organization solutions.
6. Potted Plants and Terrariums:
Introduce greenery into your bedroom with potted plants or create your own mini ecosystem with a DIY terrarium. Plants not only freshen the air but also add a touch of natural beauty to your space.
7. Custom Lighting Fixtures:
Design and assemble your own lighting fixtures or lampshades. This can range from crafting a unique pendant light to decorating existing fixtures with paint or fabric. Creative lighting can dramatically alter the mood of your bedroom.
8. Fabric Canopy or Drapes:
Create a dreamy and romantic atmosphere with a fabric canopy over your bed or flowing drapes around your windows. Choose fabrics that complement your color palette and style and install them using simple hardware.
9. Hand-Painted Accent Wall:
Transform one wall in your bedroom into a captivating focal point with hand-painted designs or patterns. Whether it’s a soothing mural, geometric shapes or an abstract masterpiece, your DIY wall art can redefine the entire space.
10. Personalized Decor and Accessories:
Craft your own decorative pillows, throw blankets or photo frames to add personal touches to your bedroom decor. These items can showcase your creativity and serve as conversation starters.
In conclusion, a stylish and personalized bedroom doesn’t have to come with a hefty price tag. DIY projects allow you to infuse your space with your unique vision and personality while keeping your budget in check. Embrace these creative endeavors and watch your bedroom transform into a haven that truly reflects your style and soul.
If you’d like to dive deeper into this subject, there’s more to discover on this page: 70 Bathroom Decorating Ideas – Pictures of Budget Bathroom Decor
Headboard Makeover
A beautiful headboard can become the focal point of your bedroom. Instead of buying a new one, consider a DIY headboard project. You can repurpose old doors, pallets or even create a fabric-upholstered headboard. Customize the design to match your bedroom’s aesthetic and you’ll have a unique piece that adds style and character.
Creating a custom DIY headboard not only allows you to save money but also adds a personal touch to your bedroom decor. Here’s how you can take your DIY headboard project to the next level and create a stunning focal point:
Repurposed Materials: Embrace sustainability by repurposing materials. Old doors, reclaimed wood, weathered pallets or salvaged architectural pieces can be transformed into unique and eye-catching headboards. These materials often come with their own history and character, adding charm to your bedroom.
Creative Design: Let your imagination run wild when designing your headboard. Sketch out your ideas or browse design inspiration online to find a style that resonates with your bedroom’s aesthetic. Whether you prefer a rustic, vintage, modern or eclectic look, there’s a DIY headboard design that can complement your decor.
Fabric-Upholstered Headboard: For a touch of luxury and comfort, consider crafting a fabric-upholstered headboard. Choose a fabric that complements your bedroom color scheme and texture. Tufted or padded designs can add depth and elegance to your DIY project.
Customization: Tailor your headboard to match your unique style and needs. Add shelving or built-in lighting for a practical twist. Incorporate decorative elements like molding, stencils or hand-painted designs to make your headboard truly one-of-a-kind.
Size and Proportion: Ensure your headboard is appropriately sized for your bed and bedroom space. It should balance the room and not overwhelm or appear too small. Measure your bed and consider the height of your ceiling when determining the dimensions.
Quality Craftsmanship: Take your time with the construction process. Precise measurements, solid construction and attention to detail are crucial for a polished and professional-looking headboard. If you’re new to DIY projects, there are plenty of online tutorials and guides to help you through the process.
Finish and Finishing Touches: Pay attention to the finish of your headboard. Stain, paint or seal the wood to protect it and enhance its appearance. Don’t forget about the hardware, such as decorative knobs or handles, which can add a final touch of personality.
Secure Installation: Properly secure your headboard to the wall or bed frame to ensure stability and safety. Follow the manufacturer’s instructions and use appropriate anchors or brackets for your wall type.
Maintenance: Regularly dust and clean your DIY headboard to maintain its beauty and longevity. Depending on the materials and finish, you may need to periodically reseal or repaint to keep it looking fresh.
Enjoy the Results: Once your DIY headboard is in place, step back and admire your handiwork. Your unique creation not only adds style and character to your bedroom but also serves as a testament to your creativity and craftsmanship.
Incorporating a DIY headboard into your bedroom decor allows you to express your individuality and make your sleeping space truly your own. With careful planning, attention to detail and a dash of creativity, your DIY headboard can become the stunning focal point that elevates the entire ambiance of your bedroom.
Additionally, you can find further information on this topic by visiting this page: 270 Bedroom Designs ideas | small modern bedside table …

Wall Decals and Stencils
Wall decals and stencils offer an easy and affordable way to add artistic flair to your bedroom walls. Whether it’s a nature-inspired mural, a geometric pattern or a motivational quote, these removable decorations allow you to experiment with different designs and styles without the permanence of paint.
Indeed, wall decals and stencils are fantastic tools for transforming your bedroom walls into a canvas for your creativity. They provide a simple yet powerful way to infuse artistic flair and personality into your space. Here’s why they are an excellent choice and how they can make a big impact on your bedroom’s aesthetics:
Limitless Design Possibilities: Wall decals and stencils open the door to a world of design possibilities. Whether you want to bring the serenity of a lush forest into your room, create a captivating focal point with a bold geometric pattern or surround yourself with daily inspiration through motivational quotes, the options are virtually limitless. You can easily find pre-designed decals and stencils to suit your taste or even explore custom options for a truly unique touch.
Easy Application and Removal: One of the greatest advantages of using decals and stencils is their user-friendly nature. Applying them is a straightforward process that doesn’t require special skills or tools. Plus, they can be easily removed without leaving behind residue or damaging your walls. This flexibility is ideal for renters or those who like to change their decor frequently.
Cost-Effective Decorating: Redecorating a room can be an expensive endeavor, especially when considering the cost of paint, brushes and other materials. Wall decals and stencils offer a cost-effective alternative that can achieve striking visual results. They allow you to make a significant design impact on a budget and you can even choose to change your wall decor seasonally or as your style evolves.
Customization and Personalization: Expressing your unique style and personality becomes effortless with wall decals and stencils. You can select designs and quotes that resonate with you on a personal level. This level of customization helps make your bedroom feel like a true reflection of your identity, creating a space that you’ll cherish.
Experimentation without Commitment: Unlike painting a mural or applying wallpaper, which can be a permanent decision, decals and stencils offer the freedom to experiment and change your mind. If you’re unsure about a particular design or want to refresh your space periodically, you can easily swap out or update your wall decor to suit your evolving tastes.
Instant Transformation: Whether you’re looking to revamp your bedroom’s look for a special occasion, to boost your mood or simply for a change of scenery, wall decals and stencils provide an almost instant transformation. Within a short time frame, you can witness the remarkable change in your room’s atmosphere and aesthetics.
In conclusion, wall decals and stencils are a versatile and budget-friendly means of unleashing your creativity and personalizing your bedroom. They offer a world of design options, allow you to experiment without fear of commitment and give you the power to instantly revitalize your space. So, whether you’re seeking a subtle enhancement or a bold statement, these decorative tools provide an accessible avenue to turn your bedroom into a canvas of self-expression and artistry.
You can also read more about this here: Wall Stencils for Painting Home Decor

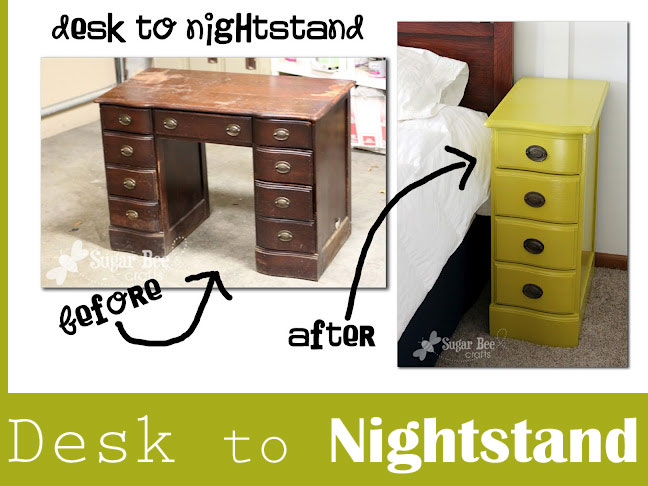
Repurpose Furniture
Before you think about buying new furniture, consider giving your existing pieces a makeover. A fresh coat of paint, new hardware or decoupage techniques can breathe new life into dressers, nightstands and vanities. With a little creativity, you can achieve a custom look that suits your bedroom’s theme.
Before you think about buying new furniture, consider giving your existing pieces a makeover. A fresh coat of paint, new hardware or decoupage techniques can breathe new life into dressers, nightstands and vanities. With a little creativity and some DIY enthusiasm, you can achieve a custom look that not only suits your bedroom’s theme but also adds a unique and personalized touch to your space. Here are some additional ideas and tips to guide you through the furniture transformation process:
Color Selection: When repainting furniture, choose colors that complement your bedroom’s color scheme and overall aesthetic. Neutral tones like white, gray or beige create a timeless and versatile look, while bolder colors can add personality and vibrancy. Consider using chalk or milk paint for a shabby-chic or vintage-inspired finish.
Hardware Upgrade: Swapping out old, worn-out hardware for new knobs, pulls or handles can make a significant difference. Hardware comes in various styles, from classic to contemporary and can instantly transform the appearance of your furniture. Ensure that the hardware you choose complements the design and theme of your bedroom.
Decoupage and Stenciling: Get creative with decoupage or stenciling techniques. Decorative paper, fabric or stencils can be applied to surfaces to add texture, patterns or artistic designs. Decoupage allows you to create a collage effect, while stenciling can produce intricate motifs or typography.
Distressing for Vintage Charm: If you prefer a vintage or distressed look, consider distressing your furniture with sandpaper or paint techniques. This adds character and a sense of history to your pieces. Be strategic in distressing areas that would naturally wear over time.
Multifunctional Furniture: Repurpose or repurpose furniture pieces to serve different functions. For example, an old wooden ladder can become a stylish towel rack or a vintage trunk can serve as a unique coffee table and storage solution. This not only breathes new life into items but also adds functionality to your space.
Fabric Upholstery: If you have upholstered furniture, consider reupholstering it with new fabric. Choose a fabric that complements your bedroom’s decor and color scheme. Reupholstering can transform an outdated piece into a statement of style and comfort.
Texture and Layering: Experiment with texture and layering techniques. You can use textured wallpaper, fabric or molding to add depth and dimension to furniture surfaces. This technique is particularly effective for creating an intricate, luxurious look.
Personalized Accents: Incorporate personalization into your furniture makeover. This could be as simple as stenciling your initials or a meaningful quote onto a piece. Personalized accents make your furniture truly one-of-a-kind.
Careful Preparation: Properly prepare your furniture before any makeover. This includes cleaning, sanding and priming as needed. Adequate preparation ensures that your chosen finishes adhere well and result in a polished final look.
Protective Finishes: After your furniture makeover, apply a protective finish, such as varnish or sealant, to preserve the new look and enhance durability. This step is crucial to ensure that your revamped furniture stands the test of time.
By giving your existing furniture a creative and personalized makeover, you not only save money but also contribute to a more sustainable approach to decorating your bedroom. Each piece will carry a story of transformation and reflect your unique style, making your bedroom truly your own.
To delve further into this matter, we encourage you to check out the additional resources provided here: 16 Ideas to Upgrade Your Bedroom Without Buying A Thing
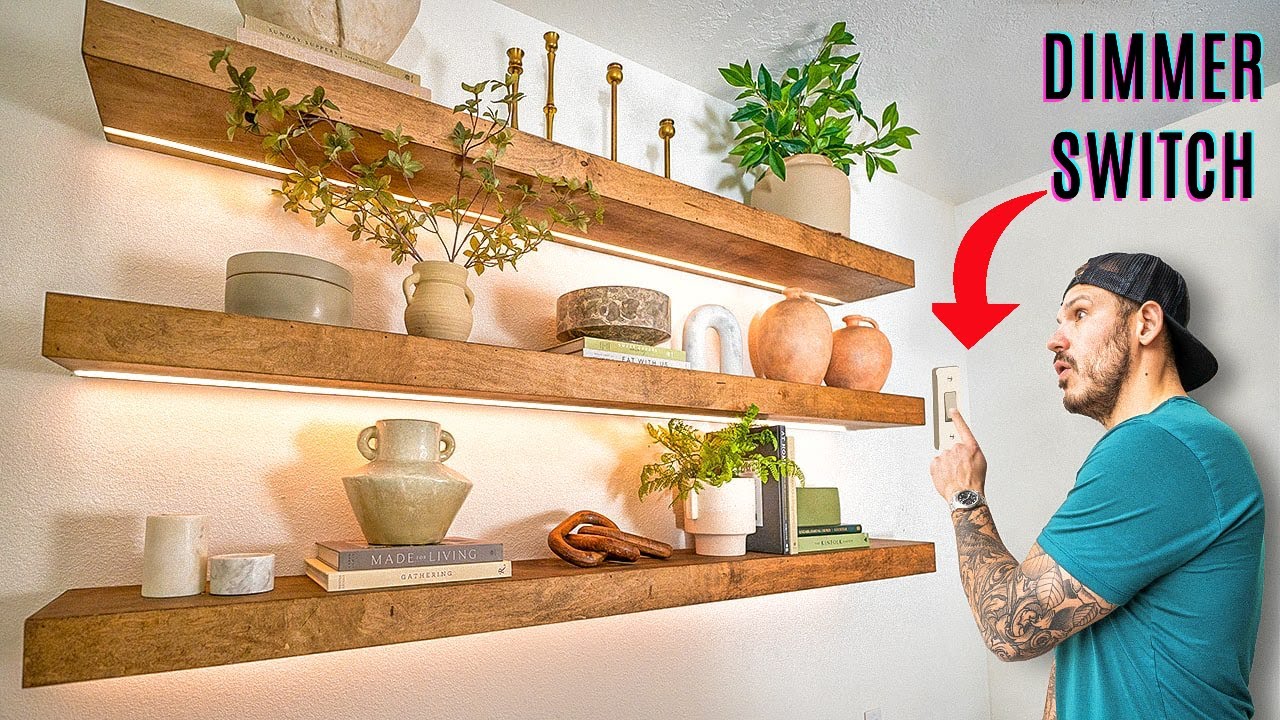
DIY Floating Shelves
Floating shelves are both stylish and practical. You can build your own using simple materials like wood planks and brackets. Arrange them on your bedroom wall to display books, plants, artwork or personal mementos. Floating shelves not only provide storage but also act as decorative elements.
Floating shelves are both stylish and practical, offering a modern and organized look to your space. Craft your own using accessible materials like wooden planks and brackets, tailoring the design to match your bedroom’s aesthetic perfectly. Once installed on your bedroom wall, you can artfully arrange them to showcase a collection of books, potted plants, cherished artwork or personal mementos.
The beauty of floating shelves lies in their versatility. They not only provide efficient storage solutions but also act as decorative elements, adding character and charm to your room. Whether you’re looking to create a mini-library, a green oasis or a curated display of your favorite things, floating shelves are the ideal canvas to personalize your space. Experiment with different arrangements and designs to transform your bedroom into an organized, visually appealing retreat.
Don’t stop here; you can continue your exploration by following this link for more details: All DIY Resources: Lowe’s
Custom Bedding
Personalized bedding adds a unique touch to your bedroom. Invest in plain, affordable bedding and use fabric paint, stencils or dye to create custom patterns or designs. You can also sew your own pillowcases or duvet covers using fabric that complements your bedroom’s color scheme.
Personalized bedding adds a unique touch to your bedroom that goes beyond mere aesthetics; it’s a reflection of your personality and style. The process of customizing your bedding can be a creative and fulfilling endeavor, allowing you to infuse your personal touch into your sleeping space.
To get started, consider investing in plain, affordable bedding as your canvas. This provides you with a blank slate to work with and it’s often more budget-friendly than buying pre-designed, high-end bedding sets. Once you have your base bedding, the options for personalization are virtually limitless.
One approach is to use fabric paint, stencils or dye to create custom patterns or designs. This method allows you to unleash your artistic talents or explore your creativity, whether you prefer bold, vibrant patterns or subtle, intricate designs. You can draw inspiration from various sources, such as nature, art or your own imagination. This personalized bedding will not only be visually appealing but also a conversation starter for anyone who visits your bedroom.
If you’re skilled with a sewing machine, you can take your customization to the next level by sewing your own pillowcases or duvet covers using fabric that complements your bedroom’s color scheme. This DIY approach allows you to choose the exact fabrics, textures and patterns that resonate with your style. You can mix and match fabrics to create a truly unique ensemble, incorporating elements that bring out the best in your bedroom’s decor.
The beauty of personalized bedding is that it evolves with you. If your tastes change over time, you can easily update your bedding to match your new style or preferences. It’s an ongoing project that keeps your bedroom feeling fresh and in sync with your personality.
Incorporating personalized bedding into your bedroom decor not only adds a distinctive flair but also enhances your connection to your living space. It transforms your bedroom into a sanctuary that reflects who you are, making it a comfortable and inviting place to unwind and rest. So, unleash your inner artist or seamstress and let your bedding become a canvas for self-expression in your personal haven.
Don’t stop here; you can continue your exploration by following this link for more details: 19 Budget-Friendly Home Renovation Ideas for Every Room

Lighting Upgrades
Swap out your standard light fixtures for DIY pendant lights or lampshade makeovers. With some creative materials like mason jars, rattan or fabric, you can craft unique lighting pieces that add ambiance and personality to your bedroom.
Transforming your bedroom’s lighting doesn’t have to be a complicated or expensive endeavor. A creative and cost-effective way to infuse personality and ambiance into your space is by swapping out your standard light fixtures for DIY pendant lights or giving your existing lampshades a makeover. By utilizing materials like mason jars, rattan or fabric, you can craft one-of-a-kind lighting pieces that not only brighten your room but also become eye-catching design features.
Mason jars are versatile and readily available materials for crafting distinctive pendant lights. You can paint them in soothing pastel hues or leave them clear for a rustic, industrial look. Fill them with fairy lights or Edison bulbs to create a warm and inviting glow. Cluster several mason jar pendant lights at different heights to form an enchanting lighting installation that becomes a captivating focal point in your bedroom.
Rattan is a natural material that can add a touch of bohemian or coastal charm to your lighting fixtures. Wrap rattan around your existing lampshades to give them a stylish, textured makeover. You can also use rattan hoops or rings to create intricate pendant light designs that cast captivating patterns on your walls and ceiling. Rattan’s organic appeal can evoke a sense of relaxation and nature in your bedroom.
Fabric opens up a world of possibilities for lampshade makeovers. You can recover lampshades with fabrics that match your bedroom’s color scheme or express your personal style. For a whimsical touch, consider using patterned or textured fabrics that introduce depth and visual interest to your lighting. Fabric-wrapped lampshades can soften the overall lighting effect, creating a cozy and inviting atmosphere.
Additionally, don’t forget about upcycling existing items. Old wire baskets, woven baskets or even unused glass vases can be repurposed into unique pendant lights with a bit of creativity and a lighting kit. These upcycled pieces not only reduce waste but also infuse your bedroom with a touch of eco-conscious design.
By embarking on these DIY lighting projects, you’re not only adding character and ambiance to your bedroom but also imbuing the space with your own creative energy. Every time you turn on one of your handcrafted lights, you’ll be reminded of the effort and care you put into making your bedroom a truly personalized and inviting retreat. It’s an opportunity to illuminate your room and your life with a touch of ingenuity and warmth.
Don’t stop here; you can continue your exploration by following this link for more details: 20 Renovation Projects to Upgrade Your Home on a Small Budget
Gallery Wall
Create a gallery wall with your favorite artwork, photographs or prints. Arrange frames in an appealing layout to transform a blank wall into a visually captivating feature. Gallery walls are customizable and can evolve over time as you collect new pieces.
Crafting a gallery wall is an artful and dynamic way to infuse your living space with personality, creativity and a touch of nostalgia. Here, we’ll delve deeper into the idea, exploring various aspects of creating a gallery wall that truly reflects your unique style and experiences:
1. Curating a Story: Your gallery wall can serve as a visual narrative of your life’s journey. Mix and match artwork, photographs and prints that hold sentimental value or convey specific themes. This storytelling aspect can make your wall not just visually captivating but emotionally resonant as well.
2. Artistic Expression: Embrace the freedom of artistic expression when designing your gallery wall. Experiment with different frame styles, sizes and layouts to create a harmonious yet eclectic composition. Allow your creativity to shine as you arrange and rearrange the pieces until you achieve a layout that feels just right.
3. Showcasing Diversity: A gallery wall offers an excellent opportunity to showcase a diverse range of artistic styles and mediums. You can blend traditional paintings with contemporary photographs or integrate various cultural influences. This diversity adds depth and intrigue to your wall.
4. Focal Point: Gallery walls can serve as a striking focal point in any room. Choose a strategic location, such as above a sofa or a dining table, to draw the eye and anchor the space. Consider using a bold statement piece as the centerpiece and arranging other items around it.
5. Flexibility and Evolution: One of the most delightful aspects of a gallery wall is its adaptability. It can evolve over time as you collect new pieces or change your preferences. This flexibility allows your living space to grow and change with you, reflecting your evolving tastes and experiences.
6. Mix Mediums: Don’t limit yourself to traditional framed pieces. Incorporate other elements like mirrors, clocks or decorative shelves into your gallery wall. These additions can break up the visual monotony and add functional elements to the display.
7. Wall Color and Lighting: Consider the backdrop against which your gallery wall will be displayed. The wall color and lighting can significantly impact the overall effect. Choose wall colors that complement your artwork and install appropriate lighting to highlight key pieces and create a welcoming atmosphere.
8. Symmetry vs. Asymmetry: Decide whether you want a symmetrical arrangement with evenly spaced frames or a more organic, asymmetrical layout. Both approaches can yield stunning results, so choose the one that resonates with your personal aesthetic.
9. Personal Touch: Integrate personal touches into your gallery wall, such as handwritten notes, postcards or small mementos framed alongside your artwork. These unique elements can add depth and sentimental value to your display.
10. Consistency in Themes: If you prefer a more cohesive look, consider maintaining consistency in themes or color schemes throughout your gallery wall. This can create a sense of unity and balance within the eclectic collection.
In summary, creating a gallery wall is not just about filling a blank space; it’s about expressing yourself, celebrating your journey and turning your walls into a canvas of memories and inspiration. With careful curation, thoughtful arrangement and a dash of creativity, your gallery wall can become a focal point of beauty and storytelling in your home, evolving alongside you as you continue to collect and create.
For additional details, consider exploring the related content available here 65 Best Dining Room Decor Ideas – Decorating Ideas on a Budget

Upholstered Bench or Ottoman
If you have some basic sewing skills, consider making your own upholstered bench or ottoman. You can repurpose an old coffee table or build a simple wooden frame and then add foam padding and fabric. It’s a budget-friendly way to introduce extra seating and a touch of luxury to your bedroom.
Crafting your own upholstered bench or ottoman is not only a budget-friendly endeavor but also a creative outlet that allows you to customize your bedroom furniture to your exact preferences. Here’s how you can embark on this DIY project with some basic sewing skills:
1. Repurposing Old Furniture: If you have an old coffee table or wooden bench lying around, it can serve as the foundation for your DIY project. Sand down any rough edges and ensure the piece is structurally sound.
2. Building a Wooden Frame: Alternatively, if you’re starting from scratch, constructing a simple wooden frame is a manageable task, even for novice DIY enthusiasts. There are plenty of online tutorials and resources to guide you through the process. Ensure the frame is sturdy and proportional to your space.
3. Foam Padding: For comfort, you’ll need foam padding. Purchase high-density foam from a craft or upholstery store and cut it to the desired size and shape for your bench or ottoman. This is where your sewing skills come in handy, as you may need to sew a custom cover for the foam if it’s not pre-cut to the right dimensions.
4. Selecting Fabric: Choose a fabric that complements your bedroom decor and is suitable for upholstery. Measure and cut the fabric to cover the foam padding with some extra material to wrap around the edges and secure it to the frame.
5. Sewing Skills: If you’re creating a custom cover for the foam padding, your sewing skills will come into play. Stitch the fabric together, ensuring a snug fit over the foam. You can use a sewing machine for a more professional finish, but hand-sewing is also an option.
6. Attaching the Upholstery: Secure the fabric-covered foam to the wooden frame using a staple gun or upholstery tacks. Start with one side and work your way around, pulling the fabric taut to create a smooth finish.
7. Finishing Touches: Trim any excess fabric and add decorative elements like buttons or piping if desired. These details can elevate the overall look of your bench or ottoman.
8. Sealing and Staining: If you’ve built a wooden frame from scratch, consider sealing or staining it to protect the wood and enhance its appearance. This step adds a professional touch to your DIY piece.
9. Optional Storage: If you’d like to maximize functionality, you can incorporate storage into your bench or ottoman. Add a hinged top or drawers underneath for convenient storage of blankets, pillows or other bedroom essentials.
10. Placement and Enjoyment: Finally, place your DIY upholstered bench or ottoman in your bedroom where it best complements your decor and provides the extra seating or luxury touch you desire. Admire your handiwork and revel in the satisfaction of having created a unique piece that adds character to your space.
Not only does this DIY project save you money compared to buying a brand-new bench or ottoman, but it also allows you to express your creativity and design sensibilities. Plus, every time you relax on your custom creation, you’ll be reminded of the effort you put into making your bedroom truly your own.
For a comprehensive look at this subject, we invite you to read more on this dedicated page: Updating our 90’s Home on a Budget – Erin Zubot Design
Decorative Throw Pillows
Give your bedroom a quick refresh by sewing or decorating your own throw pillows. Mix and match fabrics, textures and patterns to create a cohesive and inviting look. DIY pillows are an excellent way to experiment with color and style.
Certainly, here’s an extended idea:
“Give your bedroom a quick and personalized refresh by taking on a creative project: sewing or decorating your own throw pillows. This DIY endeavor not only adds a personal touch to your space but also allows you to express your unique style and creativity.
When it comes to DIY throw pillows, the possibilities are virtually limitless. Start by selecting a variety of fabrics, each with its own texture, color and pattern. Mixing and matching these materials can be a delightful adventure in design. You can opt for complementary colors and patterns for a harmonious look or you can embrace the eclectic charm of contrasting elements for a more vibrant and dynamic aesthetic.
Sewing your own throw pillows provides a sense of accomplishment and allows you to tailor them to your desired size and shape. Whether you prefer square, rectangular or even custom-shaped pillows, you have complete control over the final product. This means you can create pillows that perfectly fit your existing decor and furniture.
Furthermore, DIY pillows are an excellent way to experiment with color and style without committing to a major home decor overhaul. If you’re drawn to a bolder color palette or a specific theme but are unsure about implementing it on a larger scale, these pillows offer a low-risk, high-reward opportunity. They can inject pops of color and personality into your bedroom while maintaining the overall versatility of your decor.
Consider adding embellishments like decorative trims, buttons or embroidery to your DIY pillows. These details can elevate the look and feel of your creations, making them truly one-of-a-kind. You can also personalize them further by adding meaningful quotes, monograms or custom designs that resonate with you.
DIY throw pillows are not only a creative outlet but also a cost-effective solution to refreshing your bedroom decor. Purchasing decorative pillows can be expensive, especially when you desire high-quality and unique designs. By making your own, you not only save money but also ensure that your bedroom reflects your individual style.
Additionally, this DIY project can be a fun and rewarding activity to undertake with friends or family. Gather your loved ones for a crafting session and bond over the creative process. It’s a wonderful way to share your passion for design and create lasting memories together.
In summary, sewing or decorating your own throw pillows is a delightful way to revitalize your bedroom decor. It allows you to experiment with colors, textures and patterns, express your creativity and personalize your space. These DIY pillows not only enhance the visual appeal of your bedroom but also infuse it with a sense of warmth and individuality that is uniquely yours.”
Additionally, you can find further information on this topic by visiting this page: 30 Easy Ways to Freshen Room 2023 — Pretty, Aesthetic Decor Ideas

Vintage or Thrift Store Finds
Explore vintage shops or thrift stores for unique decor pieces like mirrors, vases or picture frames. A coat of paint or some minor repairs can turn these budget-friendly finds into stylish bedroom accents.
Venturing into vintage shops or browsing through thrift stores can be a treasure hunt for the creative decorator. These hidden gems are filled with the potential to infuse your bedroom with character and charm and it’s often more affordable than you might think. Let’s dive a little deeper into this exciting world of second-hand finds and how you can transform them into distinctive and stylish accents for your bedroom.
1. Mirrors that Reflect Your Style: Vintage mirrors come in a plethora of shapes and sizes, each with its own unique personality. An ornate gold-framed mirror can add a touch of opulence, while a weathered wooden frame can create a rustic vibe. After snagging the perfect mirror, consider giving it a fresh coat of paint to match your bedroom’s color scheme. Alternatively, leave it as-is for that shabby chic or eclectic look. Placing mirrors strategically can also enhance the sense of space and light in your room.
2. Vases for Floral Flourish: Thrifted vases can be a fantastic way to display fresh or faux flowers in your bedroom. Whether you prefer the elegance of crystal, the simplicity of glass or the earthiness of ceramic, you’re likely to find a vase that resonates with your style. A single coat of spray paint in a complementary color can unify a collection of mismatched vases, giving them a cohesive and refined appearance. These vases can serve as stunning centerpieces on your nightstand or atop a dresser.
3. Picture Frames Tell a Story: Vintage picture frames have an undeniable charm. You can use them to showcase your favorite artwork, family photos or even create a gallery wall in your bedroom. When selecting frames, pay attention to the details – intricate carvings, unique shapes or interesting textures. Painting the frames all in the same color or staining them to match your furniture can provide a harmonious look or you can leave them in their original state for a more eclectic vibe.
4. Minor Repairs, Major Transformation: It’s common to find items in vintage shops that may need a little TLC. Whether it’s a loose hinge on a cabinet, a wobbly chair leg or a tarnished lamp, don’t be deterred by minor imperfections. These issues can often be fixed with a few simple repairs. Embrace your inner DIY enthusiast and with a bit of elbow grease and creativity, you can restore these pieces to their former glory, breathing new life into your bedroom decor.
5. Eco-Friendly and Unique: Choosing second-hand decor not only adds character to your space but also contributes to sustainability by repurposing and reusing items. It’s a way to reduce your environmental footprint while infusing your bedroom with a sense of history and individuality.
In conclusion, exploring vintage shops and thrift stores can be a rewarding adventure for the budget-conscious decorator. Each piece you discover tells a story and offers an opportunity for personalization. With a little creativity and a touch of DIY spirit, you can turn these affordable finds into stylish and distinctive accents that make your bedroom truly one of a kind. So, let your imagination run wild and embrace the world of second-hand decor to transform your bedroom into a unique and inviting haven.
Should you desire more in-depth information, it’s available for your perusal on this page: 900+ Thrift Finds ideas in 2023 | perfect side table, thrift finds …

DIY bedroom projects not only save you money but also allow you to infuse your personal style into your space. With a little creativity and effort, you can achieve a stylish and unique bedroom that reflects your personality and becomes your favorite retreat. So, roll up your sleeves, gather your materials and embark on the journey of transforming your bedroom into a stylish haven on a budget.
DIY bedroom projects are not just about cost savings; they offer you the opportunity to breathe life into your personal oasis. By putting in some creativity and dedicated effort, you can craft a bedroom that’s not only stylish but also an authentic reflection of your individuality. It’s a chance to infuse your space with elements that resonate with your soul, creating a haven that truly feels like home.
With each brushstroke or carefully chosen decor item, you’re telling a story, painting a picture of who you are and what brings you joy. It’s a canvas waiting for your unique strokes, a stage where your style takes center stage.
Imagine the satisfaction of stepping into a room that you’ve meticulously transformed into a sanctuary perfectly tailored to your tastes. It becomes more than just a place to sleep; it’s your retreat, your haven. The effort you put in will pay off every night as you unwind in a space that resonates with your spirit.
So, don’t hesitate to roll up your sleeves, gather your materials and embark on this journey of self-expression and transformation. With a bit of ingenuity, your budget can be your greatest ally in creating a stylish and personalized bedroom that you’ll cherish for years to come. Embrace the DIY spirit and let your creativity soar. Your bedroom is waiting to become a testament to your unique style and personality.
If you’d like to dive deeper into this subject, there’s more to discover on this page: From Builder Grade to Custom Made — 20 DIY Projects You Can …
More links
Explore this link for a more extensive examination of the topic: Embrace Your Space: Organizing Ideas and Stylish Upgrades for …