
Table of Contents
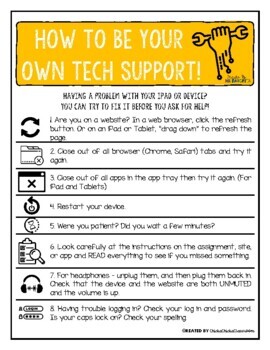
- Close Unnecessary Apps
- Clear Cache
- Update Software
- Factory Reset (Last Resort)
- Adjust Screen Brightness
- Turn Off Unnecessary Features
- Check Battery Usage
- Update Apps
- Restart Your Router
- Forget and Reconnect
- Reset Network Settings
- Check for Interference
- Clean the Screen
- Restart Your Tablet
- Check for Software Updates
- Perform a Hard Reset (Caution)
- Update Apps
- Clear App Cache
- Uninstall and Reinstall
- Check for Software Updates
- Check Volume Settings
- Restart Your Tablet
- Plug and Unplug Headphones
- Check App Settings
Tablets have become an indispensable part of our lives, serving as versatile tools for work, entertainment and communication. However, like any electronic device, tablets are not immune to problems and glitches that can disrupt your daily routine. Whether you own an Android tablet, an iPad or any other brand, encountering issues can be frustrating. But fear not! In this article, we will explore some of the most common tablet problems and provide you with effective troubleshooting tips to get your device back on track.
Tablets have undeniably entrenched themselves as indispensable companions in our modern lives, effortlessly blending productivity, entertainment and communication into a single portable package. Yet, the very nature of their complexity means they are not immune to occasional hiccups and glitches that can disrupt the seamless flow of your daily routine. Whether you’re wielding an Android tablet, an iPad or any other brand in the vast tablet galaxy, encountering issues can be frustrating and perplexing. But rest assured, you need not be daunted by these challenges. In this article, we embark on a journey to demystify some of the most common tablet problems and equip you with effective troubleshooting tips to reignite the smooth operation of your cherished device.
1. Slow Performance: Over time, your tablet may exhibit a gradual decline in speed and responsiveness. This can be attributed to various factors, including app clutter, background processes and software updates.
Troubleshooting Tip: Begin by closing unnecessary background apps, uninstalling unused or resource-intensive applications and clearing cached data. Additionally, ensure your tablet’s operating system and apps are up to date to benefit from performance improvements and bug fixes.
2. Battery Drain: One of the most exasperating issues tablet users encounter is rapid battery depletion. If your tablet seems to lose power quicker than usual, it can disrupt your on-the-go experience.
Troubleshooting Tip: Examine your battery usage in settings to identify power-hungry apps. Adjust their settings to optimize battery consumption or restrict background activity. Lower your screen brightness and consider enabling battery-saving modes when not in use.
3. Wi-Fi Connectivity Problems: In an age defined by connectivity, Wi-Fi issues can be particularly vexing. Slow or unstable Wi-Fi connections can hamper your ability to browse the web, stream content or communicate effectively.
Troubleshooting Tip: Start by rebooting your router and tablet. Check for interference or distance from the router, as these can impact signal strength. Updating your tablet’s Wi-Fi drivers or adjusting advanced Wi-Fi settings may also help resolve connectivity issues.
4. App Crashes: Apps occasionally crash or freeze, disrupting your workflow or entertainment experience. This can occur due to software bugs or conflicts.
Troubleshooting Tip: Ensure your apps are updated to the latest versions available on your tablet’s respective app store. If a specific app is causing consistent issues, try uninstalling and reinstalling it. Additionally, check for system updates that might address compatibility problems.
5. Touchscreen Responsiveness: A tablet’s touchscreen is its primary interface and issues like unresponsive or erratic touch inputs can be incredibly frustrating.
Troubleshooting Tip: Clean your tablet’s screen and ensure there’s no physical damage. If problems persist, restart your tablet and perform a factory reset only as a last resort, as it will erase all data.
6. Storage Constraints: Running out of storage space can stifle your tablet’s performance and hinder your ability to store important files and media.
Troubleshooting Tip: Delete unnecessary files, photos and apps. Transfer large media files to external storage or cloud services. Consider using a microSD card if your tablet supports expandable storage.
7. Software Glitches: Software glitches can manifest in various ways, from random reboots to unresponsive interfaces.
Troubleshooting Tip: Check for software updates, as they often contain bug fixes. If issues persist, consider performing a factory reset, but remember to back up your data first.
8. Overheating: Tablets can heat up during resource-intensive tasks, but excessive heat can be problematic.
Troubleshooting Tip: Avoid using your tablet on soft surfaces that can block ventilation. Close unused apps to reduce CPU load and ensure your tablet isn’t exposed to direct sunlight or high ambient temperatures.
In conclusion, while tablet problems can be disconcerting, they need not disrupt your digital life. Armed with these troubleshooting tips, you can often resolve common issues and restore your tablet to peak performance. Remember that patience and methodical troubleshooting are your allies in conquering these challenges, ensuring that your tablet continues to be a reliable companion in your day-to-day endeavors.
To delve further into this matter, we encourage you to check out the additional resources provided here: Handling common HTML and CSS problems – Learn web …
Close Unnecessary Apps
Running too many apps in the background can slow down your tablet. Close any apps you’re not using.
Running too many apps in the background can significantly slow down your tablet’s performance, akin to a traffic jam on a busy highway. Each app consumes valuable system resources, such as CPU and RAM, even when they’re not in active use. This can lead to a noticeable decrease in responsiveness and overall functionality.
When you open an app on your tablet, it doesn’t necessarily close when you hit the home button or switch to another app. Instead, it might continue running in the background, ready to pick up where you left off when you return to it. While this multitasking capability is undoubtedly convenient, it can become a double-edged sword if left unchecked.
Here’s why closing unnecessary background apps is crucial:
1. Resource Allocation: Every app that runs in the background consumes CPU power and memory. When too many apps are active, your tablet’s resources become divided, leading to slower performance for all running processes.
2. Battery Drain: Running numerous apps in the background not only strains the CPU and RAM but also drains your tablet’s battery much faster. This can result in shorter usage times between charges.
3. Increased Heat: Overburdened resources can cause your tablet to heat up, potentially leading to overheating issues or reduced battery lifespan.
To prevent these problems and keep your tablet running smoothly, it’s essential to regularly close apps that you’re not actively using. Here’s how you can do it:
Android Devices: On most Android tablets, press the square or recent apps button (usually located at the bottom of the screen) to view your open apps. Swipe left or right to browse through them, then swipe up or tap the “X” on each app’s thumbnail to close it.
iOS Devices (iPad): On iPads with Face ID, swipe up from the bottom of the screen and pause in the middle to view your open apps. On iPads with a home button, double-click the home button. Then, swipe up on each app’s preview to close it.
By routinely managing your background apps, you’ll not only enjoy a snappier tablet experience but also prolong its battery life and reduce the risk of overheating. It’s a small effort that can make a significant difference in your device’s overall performance and longevity.
For a comprehensive look at this subject, we invite you to read more on this dedicated page: Remove unwanted ads, pop-ups and malware – Android – Google Help
Clear Cache
Clearing app cache can free up storage and improve performance. Navigate to your tablet’s settings, find the “Apps” or “Storage” section and clear cache for individual apps or all apps.
Clearing your app cache is a valuable maintenance practice that can breathe new life into your tablet. Here’s a more detailed look at why and how it works:
Storage Optimization: Over time, apps accumulate temporary data and cached files to enhance their performance. While this cache data is beneficial for faster app loading and smoother user experiences, it can grow excessively and consume valuable storage space. Clearing the cache helps free up storage, ensuring that you have more room for essential files and apps.
Improved App Performance: As the cache accumulates, it can sometimes lead to sluggish app performance. Clearing the cache essentially resets this data, allowing apps to start with a fresh slate. This can result in improved responsiveness, reduced app crashes and smoother navigation within apps.
Fixing App Issues: If you encounter issues with a specific app, such as freezing, crashes or unusual behavior, clearing the app’s cache can often resolve these problems. It eliminates corrupted or outdated cache data that may be causing the issues, allowing the app to function properly again.
Privacy and Security: Clearing app cache can also enhance your privacy and security. Cached data may include sensitive information, such as login credentials or personal details, which could potentially be accessed if your tablet falls into the wrong hands. Regularly clearing the cache minimizes this risk.
Minimizing Data Usage: Some apps use cached data to load content quickly, reducing the need to download images or information repeatedly from the internet. While this can save on data usage, it’s essential to periodically clear the cache to ensure you’re not storing unnecessary or outdated data.
Here’s how to clear app cache on your tablet:
Android: Navigate to your tablet’s “Settings,” then find the “Apps” or “Application Manager” section. From there, you can select individual apps and tap on the “Clear Cache” button for each one. Alternatively, some Android devices offer an option to clear the cache for all apps simultaneously.
iOS (iPad): Unfortunately, iOS doesn’t provide a built-in feature to clear app cache on a per-app basis. However, you can achieve similar results by uninstalling and reinstalling individual apps. This process clears the app’s cache but also deletes the app itself, so make sure to back up any essential data within the app before doing so.
Windows: On Windows tablets, you can clear app cache by going to “Settings” > “Apps” > “Apps & Features.” Select the app you want to clear the cache for and click “Advanced Options.” Under “Reset,” you’ll find the option to “Repair” or “Reset” the app. Choosing “Reset” will clear the app’s cache.
Clearing app cache is a straightforward but powerful maintenance step that can revitalize your tablet’s performance, create more storage space and resolve app-related issues. Make it a part of your routine device care to ensure your tablet consistently delivers a smooth and responsive user experience.
For additional details, consider exploring the related content available here Troubleshoot viewing PDF files on the web

Update Software
Outdated software can lead to performance issues. Make sure your tablet’s operating system is up to date.
Maintaining your tablet’s operating system is a fundamental aspect of device management that should not be overlooked. Here’s why staying up to date is so important:
1. Performance Enhancement: Each new operating system update typically comes with performance improvements, bug fixes and optimizations. By keeping your tablet’s OS up to date, you ensure that it runs smoothly, responds quickly and functions at its best.
2. Security Patches: One of the most critical reasons to update your tablet’s OS is to receive security patches. Cybersecurity threats are constantly evolving and outdated software becomes a prime target for attackers. Regular updates provide essential defense mechanisms to protect your tablet and your data from vulnerabilities and potential breaches.
3. Compatibility: Newer apps and features may require the latest operating system versions. By updating, you ensure that your tablet remains compatible with a wide range of applications and services. This keeps your device versatile and up to date with the latest technology trends.
4. Improved Battery Life: OS updates often include power management enhancements, which can extend your tablet’s battery life. By optimizing how your device uses power, you can enjoy longer usage between charges.
5. Enhanced Features: Operating system updates often introduce new features and functionalities, enhancing your tablet’s capabilities. These improvements can make your device more versatile and enjoyable to use.
6. Bug Fixes: Software bugs can be frustrating, leading to crashes or malfunctions. Updates typically include bug fixes that address known issues, improving the overall stability and reliability of your tablet.
7. Longevity: Regularly updating your tablet’s operating system can extend its lifespan. By staying current, you reduce the risk of software-related issues that might lead to the premature retirement of your device.
8. Data Security: Updated operating systems often include improvements to data encryption and user privacy features, offering you better protection for your personal information.
9. User Experience: A well-maintained tablet provides a better user experience. You’ll enjoy a faster, more responsive device with access to the latest features and security protections.
10. Peace of Mind: Knowing that your tablet is running the latest software can give you peace of mind. You’re less likely to encounter compatibility problems, security breaches or performance issues, allowing you to use your tablet with confidence.
In summary, keeping your tablet’s operating system up to date is essential for performance, security and overall user satisfaction. Regular updates not only enhance your tablet’s functionality but also safeguard your data and ensure its compatibility with the latest apps and services. Therefore, make it a routine practice to check for and install OS updates, ensuring that your tablet remains a reliable and secure companion in our digital age.
To expand your knowledge on this subject, make sure to read on at this location: Fix common Surface problems using the Surface app and Surface …

Factory Reset (Last Resort)
If the problem persists, consider a factory reset, but make sure to back up your data first, as this will erase everything on your tablet.
If the problem persists on your tablet, it can be frustrating and disruptive to your digital routine. While troubleshooting, you may reach a point where a factory reset seems like the most viable solution. However, it’s crucial to approach this step with caution and thorough preparation, as it will erase everything on your tablet. Here are some important considerations:
1. Data Backup:
Before initiating a factory reset, ensure that you have backed up all your important data, including contacts, photos, documents and any other files you want to preserve. This step is essential to prevent permanent data loss.
2. Cloud Backup:
Take advantage of cloud backup services offered by your tablet’s operating system or third-party apps. These services can automatically sync your data to the cloud, making it easily accessible after the factory reset. Ensure that your cloud backup is up to date.
3. Manual Backup:
Manually transfer files to a computer or external storage device, such as a USB drive or an external hard drive. This provides an extra layer of security for your data, especially if you have files that are not part of your cloud backup.
4. Note App and Passwords:
Make a list of your installed apps, especially those with valuable data and take note of your usernames and passwords. After the factory reset, you’ll need to reinstall your apps and log in again.
5. Factory Reset Process:
The process for performing a factory reset can vary depending on your tablet’s make and model, so consult the user manual or the manufacturer’s website for specific instructions. Typically, it involves accessing the settings or recovery mode to initiate the reset.
6. Secure Factory Reset:
Some tablets offer the option to perform a secure factory reset, which ensures that your data is completely wiped and unrecoverable. This is particularly important if you are planning to sell or dispose of your tablet.
7. Post-Reset Setup:
After the factory reset, your tablet will be in a fresh-out-of-the-box state. You’ll need to go through the initial setup process, including selecting your language, connecting to Wi-Fi and signing in with your Google or Apple ID, depending on your tablet’s operating system.
8. Data Restoration:
Once your tablet is set up, you can begin restoring your data. This can be done by reinstalling apps from your app store, signing in to your cloud account to retrieve synced data and transferring manually backed-up files.
9. Preventive Measures:
To avoid future issues that may lead to a factory reset, consider regular maintenance. Keep your tablet’s software and apps up to date, clear cache and unnecessary files and be cautious about the apps you install to avoid malware or conflicts.
10. Seek Professional Help:
If you’re uncertain about performing a factory reset or if the problem persists even after the reset, it’s advisable to seek assistance from a professional or the tablet’s manufacturer’s customer support.
In conclusion, a factory reset can be a last-resort solution for persistent tablet issues, but it should be approached with careful planning and data backup. With the right precautions, you can resolve problems while safeguarding your valuable data and ensuring a smoother tablet experience in the future.
To expand your knowledge on this subject, make sure to read on at this location: Computer Basics: Basic Troubleshooting Techniques

Adjust Screen Brightness
Lower the screen brightness or enable adaptive brightness in your settings to save battery.
“Lowering the screen brightness or enabling adaptive brightness in your settings is a simple yet effective way to extend your device’s battery life while also enhancing your overall user experience. Here’s why it’s a smart choice:
Prolonged Battery Life: By reducing the screen’s brightness, you’re directly decreasing the power consumption of one of the most energy-intensive components of your device. This translates to more usage time before you need to recharge, making it especially handy when you’re on the go or in situations where charging isn’t readily available.
Eco-Friendly: Besides saving you money on electricity and reducing the need for frequent charging, lowering screen brightness also has positive environmental implications. Using less energy helps decrease your carbon footprint and contributes to a more sustainable lifestyle.
Adaptive Brightness: Many modern devices come equipped with adaptive brightness settings. These systems use ambient light sensors to automatically adjust the screen’s brightness based on your environment. This not only optimizes battery usage but also ensures that your screen is easy to read in varying lighting conditions, improving both convenience and battery efficiency.
Eye Comfort: Lowering screen brightness can also be gentler on your eyes, especially in low-light settings. High screen brightness in dark environments can strain your eyes and disrupt your sleep patterns, so dimming the display when needed promotes better eye health and sleep hygiene.
Customization: Most devices allow you to customize brightness settings to your liking. You can adjust it to a level that suits your preferences, balancing energy savings with visibility. Some devices even offer night modes or blue light filters to further reduce eye strain.
App-Specific Control: Some operating systems and apps now offer granular control over brightness for individual applications. For instance, you can reduce brightness for reading apps while keeping it higher for video streaming or photo editing, ensuring optimal battery usage for each activity.
Extend Device Longevity: Using lower screen brightness can also extend the overall lifespan of your device. Reduced heat generation from a dimmer screen can help prevent overheating and potential damage to internal components.
Easy to Revert: Lowering screen brightness is reversible with just a few taps in your device settings. When you need maximum brightness for outdoor use or specific tasks, you can easily adjust it back to your desired level.
In conclusion, taking advantage of screen brightness adjustments and adaptive brightness settings not only preserves your device’s battery life but also offers environmental benefits, improves your eye comfort and allows for a more customized and versatile user experience. It’s a small change that can make a big difference in how you use and maintain your digital devices.”
For additional details, consider exploring the related content available here 12 fast fixes for common Android problems | Computerworld

Turn Off Unnecessary Features
Disable Wi-Fi, Bluetooth and GPS when you’re not using them. Background processes can drain the battery.
Conserving battery life on your device is essential and one effective strategy is to disable power-hungry features like Wi-Fi, Bluetooth and GPS when they’re not in use. Here’s a more detailed exploration of why this practice is crucial and some additional tips for optimizing your device’s battery performance:
1. Wi-Fi: When your device constantly searches for and connects to Wi-Fi networks, it consumes significant power. By disabling Wi-Fi when you’re not actively browsing the internet or using Wi-Fi-dependent apps, you can prolong your battery life. Alternatively, consider using the device’s “Wi-Fi Sleep” or “Airplane Mode” feature to automate this process when the screen is off or during periods of inactivity.
2. Bluetooth: Bluetooth is another energy-intensive feature, especially if it’s left on but not actively connected to a device like headphones or a speaker. Turning off Bluetooth when you’re not using it prevents your device from continuously searching for nearby Bluetooth devices, conserving battery power.
3. GPS: GPS functionality is essential for navigation and location-based apps, but it can be a significant battery drain. Unless you’re using a mapping or location-based service, disabling GPS can help extend your device’s battery life. You can opt for “Battery Saving” mode or restrict location access to specific apps when not in use.
4. Background Processes: Beyond connectivity features, background processes and apps running in the background can also contribute to battery drain. It’s a good practice to periodically review and close apps running in the background, especially resource-intensive ones. Additionally, you can enable “Background App Refresh” settings to be more selective about which apps are allowed to update in the background.
5. Screen Brightness: The screen is one of the most power-hungry components of your device. Adjusting the screen brightness to an appropriate level based on your surroundings can have a substantial impact on battery life. Consider using automatic brightness adjustments or manually lowering the brightness in dimly lit environments.
6. Push Email and Notifications: Push email and constant notifications can keep your device awake and consume power. Consider adjusting your email settings to fetch messages at longer intervals or manually when needed. Similarly, review app notification settings to reduce unnecessary alerts.
7. Battery-Saver Mode: Many devices offer battery-saving or low-power modes that optimize settings to extend battery life. Activating these modes can limit background processes, reduce screen brightness and manage power-hungry features, often with just a single tap.
8. Regular Updates: Keeping your device’s operating system and apps up to date is important. Developers often release updates that include battery optimizations and bug fixes, which can contribute to improved battery life.
9. Battery Usage Monitoring: Most devices provide tools to monitor battery usage and identify apps or processes that consume the most power. Use these tools to identify and address battery-draining culprits.
10. Portable Chargers: For situations where you can’t conserve battery life due to heavy use, consider carrying a portable charger or power bank. These devices can provide a quick recharge when you’re on the go.
In conclusion, managing your device’s connectivity features and optimizing settings to minimize battery drain is a practical way to extend battery life. By being mindful of which features are enabled and when, you can strike a balance between functionality and power conservation, ensuring that your device remains powered when you need it most.
Looking for more insights? You’ll find them right here in our extended coverage: Gmail Is Not Working: Common Gmail Problems and How to Solve …

Check Battery Usage
Go to your tablet’s settings and check which apps are consuming the most battery. You can restrict or uninstall power-hungry apps.
Taking control of your tablet’s battery life is a practical way to ensure it lasts longer between charges and continues to perform at its best. Here’s a step-by-step guide to help you make the most of your tablet’s battery:
Access Your Tablet’s Settings: Begin by opening your tablet’s settings. This is typically represented by a gear or cogwheel icon and can be found on your home screen or in the app drawer.
Navigate to Battery Settings: Within the settings menu, scroll or search for the “Battery” option. This is where you’ll find detailed information about your tablet’s power consumption.
Check Battery Usage: Tap on “Battery” to access the battery usage screen. Here, you’ll see a breakdown of how your tablet’s battery is being used, with a list of apps and their respective battery usage percentages.
Identify Power-Hungry Apps: Review the list of apps to identify which ones are consuming the most battery. Apps that run in the background or those that you use frequently may appear near the top of the list.
Restrict Background Activity: Some apps continue to run in the background even when you’re not actively using them. To conserve battery life, tap on the power-hungry app(s) and look for options to restrict background activity. This prevents them from using resources when you’re not actively using them.
Adjust App Settings: For certain apps, you can customize their behavior to be more power-efficient. This may include reducing the frequency of updates or notifications, lowering screen brightness when using the app or enabling power-saving modes within the app itself.
Consider Uninstalling or Replacing Apps: If you find that certain apps consistently drain your battery and you don’t use them frequently, consider uninstalling them. Alternatively, look for alternative apps that offer similar functionality but are more energy-efficient.
Monitor Battery Saver Mode: Most tablets offer a battery saver mode that can be enabled to limit background processes and reduce screen brightness. You can choose to enable this mode manually or set it to activate automatically when your battery reaches a certain percentage.
Regularly Update Apps and Software: Keeping your tablet’s operating system and apps up to date can often lead to improved battery efficiency. Developers release updates that may include optimizations for better power management.
Optimize Screen Settings: The screen is one of the biggest battery consumers. Adjust the screen timeout to a shorter duration and reduce screen brightness when possible. Many tablets also offer adaptive brightness settings that adjust the screen brightness based on ambient light conditions.
Manage Connectivity: Turn off Wi-Fi, Bluetooth and GPS when you’re not using them. These connections can drain the battery, especially when they are left on in the background.
By following these steps and regularly monitoring your tablet’s battery usage, you can extend its battery life and ensure that it remains a reliable and efficient companion for all your tasks and entertainment.
You can also read more about this here: Computer Basics: Basic Troubleshooting Techniques

Update Apps
Ensure all your apps are up to date. Developers often release updates that optimize battery usage.
Keeping your apps up to date is a fundamental practice for not only enjoying the latest features and improvements but also for optimizing your device’s battery usage. Here’s a deeper exploration of this essential idea:
Bug Fixes and Performance Enhancements: App updates frequently include bug fixes and performance enhancements. By staying current with these updates, you ensure that your apps run smoothly and efficiently. This, in turn, reduces the strain on your device’s resources, ultimately contributing to better battery life.
Battery Optimization: Developers often fine-tune their apps to be more energy-efficient in each update. This can involve optimizing code, reducing background processes and enhancing power management. By regularly updating your apps, you benefit from these battery-saving improvements and can expect longer usage between charges.
Security Patches: App updates frequently include crucial security patches. Outdated apps can be vulnerable to security breaches and data leaks, which not only pose privacy risks but also consume additional battery power as malicious activities may run unnoticed. Keeping your apps up to date helps safeguard your device and your battery life.
Compatibility: As mobile operating systems evolve, apps need to adapt to these changes. Outdated apps may encounter compatibility issues with newer OS versions, leading to increased resource usage and reduced battery life. App updates ensure that your apps remain compatible with the latest OS updates.
Feature Enhancements: App updates often introduce new features that can enhance productivity or provide additional functionalities. These features might include built-in dark modes, which, when used, can reduce battery consumption on devices with OLED screens by displaying more black pixels.
Resource Management: Developers continually work on optimizing how their apps use system resources like CPU, RAM and GPU. App updates may include improvements in resource management, reducing the strain on these components and consequently improving battery efficiency.
Background Activity Control: App updates may include enhancements to control background processes and limit resource-intensive activities when the app is not in use. This background activity management can significantly impact battery life by preventing apps from draining power when not needed.
App-Specific Settings: In some cases, app updates introduce new settings that allow users to customize how the app behaves. These settings can include options to reduce background data usage or limit notifications, both of which can help extend battery life based on individual preferences.
Overall Device Health: Regularly updating apps contributes to the overall health of your device. A well-maintained device tends to perform more efficiently and can extend its overall lifespan, saving you money and reducing electronic waste.
In conclusion, ensuring that all your apps are up to date is a simple yet highly effective strategy for optimizing your device’s battery usage. App updates bring not only performance improvements and new features but also critical enhancements in energy efficiency and security. By staying current with app updates, you can enjoy a smoother, safer and more energy-efficient mobile experience.
For additional details, consider exploring the related content available here Fix problems downloading apps from the Play Store – Google Help

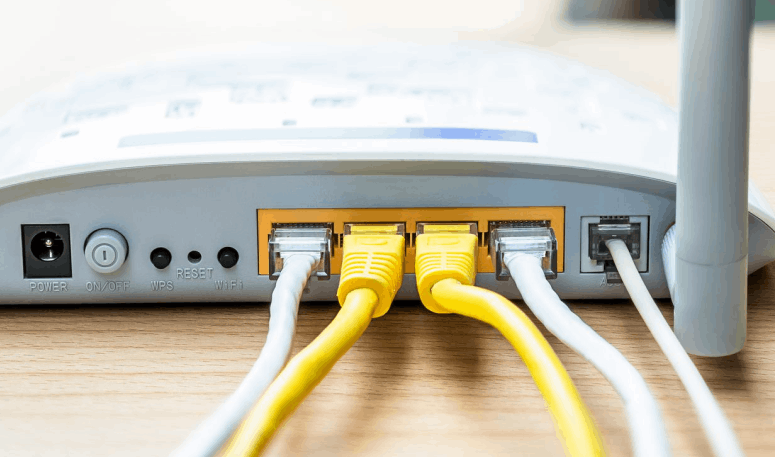
Restart Your Router
Sometimes, the issue is with your Wi-Fi router. Turn it off, wait a minute and then turn it back on.
When you encounter connectivity issues, it’s essential to troubleshoot the potential causes effectively and your Wi-Fi router is a critical part of the equation. Here’s an extended explanation of why restarting your Wi-Fi router can often resolve connectivity problems:
Router Memory and Performance: Over time, Wi-Fi routers can accumulate temporary data and memory leaks that might hinder their performance. Restarting the router clears these memory caches, essentially giving it a fresh start. This can resolve issues caused by memory-related problems and improve overall router performance.
Software Updates and Glitches: Routers, like any other electronic device, rely on software to function correctly. Occasionally, software glitches or errors can occur, leading to connectivity problems. Restarting the router allows it to reload its software, potentially resolving any issues caused by software glitches or conflicts.
Connection Refresh: Restarting the router essentially refreshes all connections to the network. This can be especially helpful when multiple devices are connected simultaneously, as it can clear up any conflicts or congestion that might be impacting network stability.
IP Address Renewal: Routers assign IP addresses to devices on your network. Sometimes, a device might experience issues due to an IP address conflict or an expired lease. Restarting the router can trigger a renewal of IP addresses for all connected devices, potentially resolving connectivity problems.
Heat and Hardware Stability: Routers generate heat during operation, which can affect the stability of their hardware components. Restarting the router gives it a chance to cool down and can help alleviate issues related to overheating, which may not be immediately obvious but can impact performance.
Temporary Network Congestion: Network congestion can happen for various reasons, such as a sudden surge in device activity or interference from neighboring networks. Restarting the router can temporarily alleviate congestion and provide a more stable connection.
Simple Troubleshooting Step: Restarting the router is a straightforward and quick troubleshooting step that doesn’t require technical expertise. It’s often recommended by internet service providers as a first step to resolve connectivity issues because it can address common issues without the need for advanced diagnostics.
Power Cycling: The process of turning the router off and then on is sometimes referred to as “power cycling.” This action can re-establish a stable connection with your internet service provider’s network infrastructure and address any issues on their end.
In summary, restarting your Wi-Fi router is a valuable and simple troubleshooting technique that can address a range of common connectivity issues. It’s often the first step recommended by tech support because it’s effective in resolving many issues related to router performance, network congestion and minor glitches. When connectivity problems arise, taking a minute to power cycle your router can save you time and frustration in the troubleshooting process.
Additionally, you can find further information on this topic by visiting this page: 9 most common network issues and how to solve them | TechTarget
Forget and Reconnect
In your Wi-Fi settings, forget the problematic network and then reconnect by entering the password.
“In your Wi-Fi settings, forget the problematic network and then reconnect by entering the password.”
This simple process can often be the solution to a range of Wi-Fi connectivity issues. However, it’s worth delving a bit deeper into why this works and exploring some additional tips and considerations:
Identifying the Problem: Before you forget and reconnect to a network, it’s helpful to understand why you’re experiencing connectivity issues. Is it slow speeds, frequent disconnects or a complete inability to connect? Diagnosing the problem can help you determine whether forgetting and reconnecting is the right solution.
Signal Strength: Sometimes, poor Wi-Fi performance is due to weak signal strength. Consider moving closer to your router or access point if possible. The closer you are, the stronger your connection will be, resulting in faster speeds and more reliable connectivity.
Interference: Wi-Fi signals can be affected by interference from other electronic devices, neighboring networks or physical obstructions. Ensure your router is placed in an optimal location and try to minimize interference by keeping other electronic devices away from it.
Router Reboot: If you notice consistent issues with a specific network, rebooting your router can help. Unplug it from the power source, wait for a minute or two and then plug it back in. This can often resolve connectivity problems.
Password Accuracy: When re-entering the Wi-Fi password, double-check that you’ve typed it correctly. Passwords are case-sensitive, so make sure you’re using the correct uppercase and lowercase letters. This simple step can save you from unnecessary frustration.
Software Updates: Ensure that both your device’s operating system and your router’s firmware are up to date. Manufacturers frequently release updates to improve performance and security, which can impact your Wi-Fi experience.
Network Congestion: During peak hours, your Wi-Fi network may become slower due to increased usage. If possible, try to use the internet during off-peak times to enjoy faster speeds.
Consider a Wi-Fi Extender or Mesh System: If you consistently struggle with Wi-Fi coverage in certain areas of your home or office, investing in a Wi-Fi extender or a mesh network system can significantly improve coverage and connectivity.
Password Management: Keep a secure record of your Wi-Fi passwords, so you don’t have to rely on memory or manual entry. Many password managers can store Wi-Fi credentials securely.
Contact Your Internet Service Provider (ISP): If you’ve tried all of the above and are still experiencing issues, it might be time to get in touch with your ISP. They can run diagnostics on your connection and potentially offer solutions or upgrades to improve your Wi-Fi experience.
In conclusion, while forgetting and reconnecting to a problematic Wi-Fi network can be a quick fix, it’s important to consider the broader context of your connectivity issues. By following these additional tips and troubleshooting steps, you can ensure a smoother and more reliable Wi-Fi experience in the long run.
For a comprehensive look at this subject, we invite you to read more on this dedicated page: 5 Common Computer Problems and Solutions | CDW

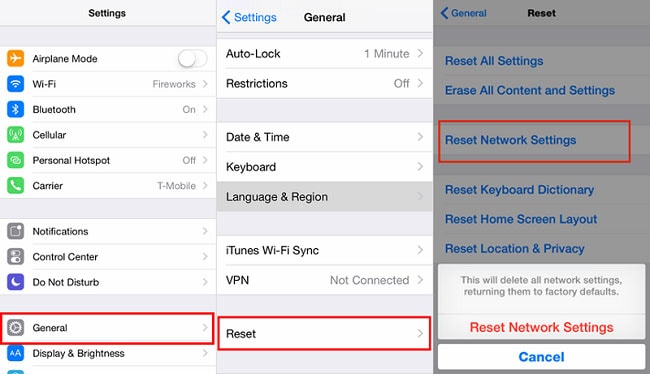
Reset Network Settings
On your tablet, reset network settings to their default values. This will remove saved Wi-Fi networks, so be prepared to re-enter passwords.
Resetting your tablet’s network settings to their default values can be a helpful troubleshooting step and can also enhance security and privacy. Here’s an extended idea on why and how to reset network settings on your tablet:
Network Optimization: Over time, your tablet accumulates network settings and connections that may no longer be necessary. This can lead to network congestion, slow connections or conflicts with newer networks. Resetting network settings helps streamline your device’s connection process, potentially improving overall network performance.
Troubleshooting: When faced with persistent network issues, such as Wi-Fi connectivity problems or mobile data issues, resetting network settings can serve as an effective troubleshooting step. It clears out any misconfigured settings or conflicting profiles that might be causing the problem.
Privacy and Security: Resetting network settings can enhance your privacy and security. It removes saved Wi-Fi passwords and other network-related information, reducing the risk of unauthorized access to your network. This is especially important if you’ve connected to public or untrusted networks in the past.
Clean Slate: By resetting network settings, you essentially give your tablet a “clean slate” for network connections. This can be beneficial when you want to start fresh with network configurations or if you’ve recently changed your home Wi-Fi router or password.
Here’s how to reset network settings on most tablets (specific steps may vary by device and operating system):
For iOS (iPad):
- Go to “Settings.”
- Scroll down and tap on “General.”
- Scroll to the bottom and tap on “Reset.”
- Select “Reset Network Settings.”
- You’ll be prompted to enter your device passcode.
- Confirm the reset.
For Android:
- Open the “Settings” app.
- Scroll down and tap on “System” (or “General Management” on Samsung devices).
- Tap on “Reset.”
- Select “Reset network settings.”
- Confirm the reset.
For Windows (Windows 10/11):
- Open the “Settings” app.
- Click on “Network & Internet.”
- Scroll down and click on “Network reset.”
- Click “Reset now.”
- Confirm the reset.
After resetting network settings, your tablet will restart and you’ll need to reconfigure your network connections. This includes re-entering Wi-Fi passwords, re-pairing with Bluetooth devices and potentially reconfiguring VPN or proxy settings if you use them.
While resetting network settings can be a useful troubleshooting step, exercise caution and ensure you have necessary information (such as Wi-Fi passwords) before proceeding. This action should be taken when necessary and not as a routine practice to avoid inconveniences.
Additionally, you can find further information on this topic by visiting this page: Fix internet connection problems on Android devices – Android Help
Check for Interference
Interference from other electronic devices or neighboring networks can disrupt your connection. Ensure your tablet is in proximity to the router.
Maintaining a stable and uninterrupted Wi-Fi connection on your tablet is essential for a smooth online experience. While Wi-Fi technology has made it incredibly convenient to stay connected, it’s susceptible to various forms of interference. One common issue that tablet users may encounter is interference from other electronic devices or neighboring Wi-Fi networks. To ensure a reliable connection, it’s crucial to be aware of potential sources of interference and take proactive steps to mitigate them. Here’s how you can enhance your tablet’s connectivity by minimizing interference:
1. Proximity to the Router:
Ensuring your tablet is in close proximity to the Wi-Fi router is an effective way to minimize interference. The closer your device is to the router, the stronger the signal strength and the less susceptible it is to interference from other electronic devices. Positioning your tablet in the same room as the router or within a reasonable range is ideal for optimal connectivity.
2. Interference Sources:
Identifying potential sources of interference is the first step in addressing connectivity issues. Common culprits include microwave ovens, cordless phones, baby monitors and even Bluetooth devices. These electronic devices operate on similar frequency bands as Wi-Fi (2.4 GHz and 5 GHz), which can lead to signal disruption when used concurrently. Try to place your tablet away from such devices or ensure they are not actively transmitting when you need a stable connection.
3. Neighboring Wi-Fi Networks:
Neighboring Wi-Fi networks can also interfere with your tablet’s connection, especially if they are operating on the same channel or frequency. To mitigate this, access your router’s settings and choose an optimal Wi-Fi channel with less congestion. Most modern routers offer automatic channel selection, which can help reduce interference.
4. Wi-Fi Extenders and Mesh Networks:
If you have a large home or areas with weak Wi-Fi coverage, consider using Wi-Fi extenders or setting up a mesh network. These devices help distribute Wi-Fi signals evenly throughout your space, reducing dead zones and the likelihood of interference.
5. Firmware Updates:
Keep your router’s firmware up to date. Manufacturers often release updates that include improvements in signal strength, stability and interference reduction. Regularly checking for firmware updates and applying them can help maintain a reliable connection.
6. Quality of Service (QoS) Settings:
Some routers offer Quality of Service (QoS) settings that allow you to prioritize certain devices or types of traffic. This can help ensure that your tablet gets preferential treatment on the network, especially when other devices are in use.
7. Signal Strength:
Check your tablet’s Wi-Fi signal strength indicator. If it shows a weak signal, consider relocating closer to the router or investing in a Wi-Fi range extender to boost coverage in your area.
8. Network Optimization Apps:
Explore network optimization apps and software that can help identify and resolve connectivity issues. These tools can provide insights into potential sources of interference and offer suggestions for improvement.
By being aware of interference sources and taking proactive measures to address them, you can significantly enhance your tablet’s Wi-Fi connectivity. A strong and stable connection ensures that you can fully enjoy the online content, productivity tools and communication features that your tablet offers without interruptions or disruptions.
Additionally, you can find further information on this topic by visiting this page: Troubleshooting issues with Skype call quality | Skype Support

Clean the Screen
Sometimes, dirt or smudges on the screen can cause unresponsiveness. Clean it gently with a microfiber cloth.
Ensuring the cleanliness of your tablet’s screen is a simple yet essential practice for maintaining its optimal functionality. Dirt, fingerprints or smudges on the screen can not only hinder its responsiveness but also detract from your overall user experience. Here’s why keeping your tablet screen clean is crucial and how to do it effectively:
Responsive Touch: A clean screen responds more accurately to touch gestures. When dirt or smudges accumulate, they can interfere with the tablet’s capacitive touch technology, resulting in missed taps, swipes or gestures. By keeping the screen pristine, you ensure that your interactions with the tablet are smooth and frustration-free.
Visual Clarity: A clean screen enhances visual clarity. Dust and fingerprints can obscure the display, affecting your ability to view content clearly. This is particularly important when reading text, watching videos or working on creative tasks. A crystal-clear screen ensures you can enjoy content at its best quality.
Protecting Against Damage: Neglecting to clean your screen can lead to more severe issues over time. Dust particles can scratch the surface of the screen when subjected to pressure or friction. Regular cleaning not only maintains visual quality but also helps protect the screen from potential damage.
Now, let’s delve into how to clean your tablet screen effectively and safely:
Turn Off the Tablet: Before cleaning, turn off your tablet or ensure it’s in sleep mode. This reduces the risk of accidental taps or interactions during the cleaning process.
Use a Microfiber Cloth: Microfiber cloths are designed for gentle and effective screen cleaning. They are soft and won’t scratch the screen. Gently wipe the screen in a circular motion to remove dirt and smudges. Avoid using abrasive materials like paper towels or tissues.
Dampen the Cloth (Optional): For stubborn smudges, you can lightly dampen the microfiber cloth with distilled water. Make sure the cloth is only slightly damp, not wet, to prevent moisture from seeping into the device. Always use distilled water to avoid mineral deposits.
Avoid Chemical Cleaners: Do not use chemical cleaners, alcohol or ammonia-based solutions on your tablet screen. These substances can damage the screen’s coatings and compromise its integrity.
Focus on Edges and Corners: Pay extra attention to the edges and corners of the screen where dirt and smudges tend to accumulate. These areas may require a bit more care during cleaning.
Screen Protectors: If your tablet has a screen protector, follow the manufacturer’s instructions for cleaning to avoid damaging the protector or leaving residues.
Frequency: Make screen cleaning a regular practice. Depending on usage, aim to clean your tablet screen weekly or whenever you notice smudges or dirt buildup.
Protective Case: Consider using a protective case with a cover or flap to shield the screen when not in use. This can help minimize contact with external elements.
By incorporating these screen cleaning practices into your tablet maintenance routine, you’ll ensure that your device remains responsive, visually appealing and free from potential damage. A clean screen not only enhances your overall tablet experience but also prolongs the lifespan of your device, allowing you to enjoy its capabilities for years to come.
To delve further into this matter, we encourage you to check out the additional resources provided here: How to Troubleshoot Touch Screen or Touch Panel Issues | Dell US

Restart Your Tablet
A simple reboot can resolve minor touchscreen issues.
Performing a simple reboot to resolve minor touchscreen issues is a quick and effective troubleshooting technique that can save you from unnecessary frustration and potential downtime. Here’s why it works and some additional tips to consider:
Clears Temporary Glitches: Over time, your device’s software may encounter temporary glitches or conflicts that can affect the touchscreen’s responsiveness. A reboot effectively clears these issues, essentially giving your device a fresh start.
Memory Management: Rebooting also helps with memory management. It frees up system resources that might have been tied up by background processes or applications. This can result in smoother touchscreen performance.
System Updates: Sometimes, your device might receive system updates that require a reboot to fully apply. By rebooting your device when prompted, you ensure that it’s running the latest software, which can include touchscreen-related fixes.
App-Related Problems: Occasionally, touchscreen issues can be linked to a specific app misbehaving. Restarting your device can help identify if a particular app is causing the problem. If the issue disappears after a reboot, it might be worth investigating that specific app for updates or conflicts.
Conservation of Battery: If you’re experiencing touchscreen issues due to low battery, a reboot can temporarily extend your device’s battery life by closing unnecessary background processes.
Regular Maintenance: Even if you’re not currently experiencing touchscreen problems, periodic reboots can help maintain your device’s overall performance. It prevents the accumulation of minor software glitches that can lead to more significant issues down the line.
While a reboot is an excellent first step for addressing minor touchscreen problems, here are a few additional tips to consider:
Clean Your Screen: Sometimes, issues can be caused by smudges, dirt or debris on the touchscreen. Clean your screen gently with a microfiber cloth to ensure optimal responsiveness.
Check for Software Updates: Ensure that your device’s operating system and apps are up to date. Manufacturers often release updates to address known issues.
Calibrate Your Touchscreen: Some devices allow you to calibrate the touchscreen to improve accuracy. Check your device’s settings for touchscreen calibration options.
Hardware Check: If the problem persists and seems to be hardware-related, consider contacting customer support or a technician for a more in-depth assessment and potential repair.
In conclusion, while a simple reboot can work wonders for resolving minor touchscreen issues, it’s also essential to maintain good digital hygiene, keep your device up to date and consider other troubleshooting steps if problems persist. These practices can help ensure that your touchscreen continues to function optimally and that you enjoy a smooth and frustration-free digital experience.
Looking for more insights? You’ll find them right here in our extended coverage: Fix issues with “Hey Google” on a mobile device – Google Help

Check for Software Updates
Ensure your tablet’s operating system is up to date, as updates often include bug fixes.
Ensuring your tablet’s operating system is up to date is a fundamental step in maintaining its functionality and security. Operating system updates not only enhance the performance and features of your tablet but also play a crucial role in fixing bugs and vulnerabilities that could compromise its stability and safety.
When developers release updates, they address known issues and bugs that users might have encountered in previous versions. These bugs could range from minor annoyances like app crashes to more critical security flaws that could potentially expose your personal information or make your tablet susceptible to cyber threats.
Furthermore, operating system updates often come with optimizations that can improve battery life, speed up your tablet’s performance and enhance compatibility with various applications. Staying updated ensures that your tablet can handle newer apps efficiently and take advantage of the latest advancements in technology.
Regularly checking for and installing updates also demonstrates responsible device management. It shows that you prioritize the security of your data and the seamless functioning of your tablet. Ignoring updates could lead to a lagging or malfunctioning device, potentially affecting your productivity and user experience.
In summary, keeping your tablet’s operating system up to date is a proactive approach that guarantees a smooth, secure and enjoyable usage experience while benefiting from the latest advancements and bug fixes.
For a comprehensive look at this subject, we invite you to read more on this dedicated page: Computer Basics: Basic Troubleshooting Techniques
Perform a Hard Reset (Caution)
If all else fails, you can try a hard reset, but this should be a last resort as it erases all data. Consult your tablet’s user manual for instructions on performing a hard reset.
Expanding on the concept of using a hard reset as a last resort for troubleshooting tablet issues:
Backup Your Data First: Before considering a hard reset, it’s crucial to back up your data. Connect your tablet to a computer or use a cloud storage service to ensure that your photos, documents and other important files are safely stored elsewhere. This precaution prevents the permanent loss of valuable information.
Understand the Consequences: Make sure you fully understand that a hard reset will erase all data on your tablet. This includes apps, settings, personal preferences and any customizations you’ve made. Consider this step only when other troubleshooting methods have failed and you have exhausted all other options.
Check for Firmware Updates: Sometimes, software issues can be resolved by updating your tablet’s firmware or operating system. Check for available updates and install them before resorting to a hard reset. These updates often include bug fixes and improvements that might address the problem you’re facing.
Battery Level: Ensure your tablet has sufficient battery power before attempting a hard reset. A low battery during the process could lead to complications or incomplete resets.
Follow Manufacturer Instructions: Consult your tablet’s user manual or visit the manufacturer’s official website for specific instructions on performing a hard reset. Different tablet models may have varying procedures and it’s essential to follow the correct steps to avoid any unintended consequences.
Consider Professional Help: If you’re uncomfortable performing a hard reset or if the issue persists even after the reset, consider seeking help from a certified technician or the tablet’s manufacturer. They may be able to diagnose and resolve the problem without data loss.
Use Recovery Mode: Some tablets offer a recovery mode that allows you to perform a factory reset without using the main user interface. This can be helpful if your tablet is unresponsive or experiencing software issues. Check your user manual for instructions on accessing and using recovery mode.
Document Your Settings: Before proceeding with a hard reset, take note of your essential settings and preferences, such as Wi-Fi passwords, email configurations and app permissions. This documentation will make it easier to set up your tablet again after the reset.
Data Restoration: After a hard reset, you will need to reinstall apps and reconfigure settings. Take this opportunity to install only the apps you truly need and reorganize your tablet for improved efficiency.
Learn from the Experience: If you find yourself needing a hard reset due to frequent issues or crashes, it might be worth investigating the root causes or seeking long-term solutions. Frequent problems may indicate underlying hardware or software issues that require attention.
In summary, a hard reset should be considered as a last resort when all other troubleshooting methods have failed to resolve persistent tablet issues. Before proceeding, ensure you have backed up your data, understand the consequences and follow manufacturer instructions carefully. It’s an extreme measure that can help resolve severe problems, but it should be used sparingly due to the complete data erasure involved.
For a comprehensive look at this subject, we invite you to read more on this dedicated page: Fix an installed Android app that isn’t working – Android Help

Update Apps
Outdated apps can be unstable. Keep your apps updated from the app store.
Absolutely, let’s delve further into the importance of keeping your apps updated:
Ensuring that your apps are consistently updated from the app store is a fundamental practice for maintaining the health and functionality of your device. Here’s why this simple task carries significant benefits:
Security Enhancements: App developers release updates not only to introduce new features but also to patch security vulnerabilities. Running outdated apps can leave your device susceptible to various security threats, including malware, data breaches and hacking attempts. By regularly updating your apps, you fortify your device’s defenses and reduce the risk of security breaches.
Bug Fixes and Stability: Outdated apps are more likely to suffer from performance issues and glitches. These problems can manifest as app crashes, freezing or unresponsiveness. App updates often include bug fixes and optimizations that enhance app stability, ensuring that they run smoothly and reliably.
Compatibility: As operating systems evolve, older app versions may become incompatible with the latest software updates. Running outdated apps on a modern device can lead to functionality issues, as these apps may not be optimized for the current environment. Updating apps ensures compatibility with the latest hardware and software, guaranteeing a seamless user experience.
Improved Features and Functionality: App updates frequently introduce new features, enhancements and improvements in user experience. By keeping your apps up to date, you gain access to these improvements, which can enhance productivity, usability and overall satisfaction with the app.
Optimized Performance: App developers continually work to optimize the performance of their apps. Updates often include performance enhancements that make apps run faster and consume fewer system resources. This not only improves app performance but also extends your device’s battery life.
Access to New Content: Some apps, especially those related to content streaming, news or social media, may limit access to certain features or content unless you’re using the latest version. By updating these apps, you ensure that you’re not missing out on new content, streaming quality improvements or exciting features.
Support and Customer Service: When you encounter issues with an outdated app, you may find it challenging to receive support from the app’s developer. Developers typically prioritize assisting users who are running the latest app versions. Staying updated ensures that you can access customer support and resolve any issues more effectively.
Data Backup and Synchronization: Many apps, especially those for productivity, cloud storage and data management, require synchronization with cloud services. Running outdated versions may result in synchronization errors or data loss. App updates often include improvements to data synchronization processes, ensuring that your data remains safe and accessible.
Compliance and Legal Requirements: In some cases, app updates may be necessary to comply with changing legal requirements, such as privacy regulations or accessibility standards. Staying up to date with app updates helps ensure that your usage remains compliant with relevant laws and regulations.
In conclusion, keeping your apps updated is not merely a matter of convenience; it’s a fundamental step in maintaining the security, performance and functionality of your device. By regularly updating your apps from the app store, you not only ensure a smoother and more secure user experience but also maximize the value and potential of your device.
If you’d like to dive deeper into this subject, there’s more to discover on this page: Fix problems downloading apps from the Play Store – Google Help
Clear App Cache
As mentioned earlier, clearing app cache can resolve some issues.
As mentioned earlier, clearing app cache can resolve some issues. This simple yet effective troubleshooting step can lead to significant improvements in your device’s performance and user experience. Here are some additional points to consider:
Frees Up Storage Space: App cache is temporary data stored by applications to speed up their operations. However, over time, this cache can accumulate and take up valuable storage space. Clearing it not only resolves issues but also frees up storage for more important data.
Fixes App Crashes: App cache can sometimes become corrupted, leading to frequent app crashes or unresponsiveness. Clearing the cache removes this corrupted data, allowing the app to function correctly again.
Improves App Loading Times: Caches are designed to speed up app loading times by storing frequently used data. However, if the cache becomes too large or outdated, it can actually slow down app performance. Clearing it ensures that the app loads quickly and efficiently.
Resolves Display and Functionality Issues: Problems like missing images, outdated content or incorrect display of information within apps can often be traced back to cached data. Clearing the cache can refresh the app, resolving these issues.
Enhances Privacy: Cached data may contain personal information or login credentials for certain apps. Clearing the cache can help protect your privacy by removing this sensitive data.
Customized Control: Most devices allow you to clear the cache for specific apps rather than all of them at once. This level of control lets you target problematic apps without affecting the entire device.
Temporary Fix for Sluggish Performance: If your device is running slow, clearing app cache can provide a temporary performance boost. It’s not a long-term solution for a slow device, but it can offer relief while you address the underlying causes.
Minimizes Data Usage: Some apps cache data to reduce the amount of data they need to download from the internet. Clearing the cache might increase data usage temporarily but can help resolve issues related to outdated or incomplete cached data.
Eases Updates and App Changes: When an app receives updates or undergoes significant changes, cached data from previous versions can sometimes cause conflicts or errors. Clearing the cache can ensure smooth transitions during updates.
Troubleshooting Step: Clearing app cache is often recommended as a preliminary troubleshooting step by customer support or forums. It’s a non-destructive action that can help rule out cache-related issues before delving into more complex solutions.
In summary, clearing app cache is a valuable maintenance practice for mobile devices. It addresses a range of common problems, enhances performance and can even protect your privacy. By incorporating it into your device maintenance routine, you can ensure a smoother, more efficient mobile experience.
To expand your knowledge on this subject, make sure to read on at this location: Fix an installed Android app that isn’t working – Android Help
Uninstall and Reinstall
If an app is consistently causing problems, uninstall it and reinstall it from the app store.
When you encounter persistent issues with a mobile app, taking the step to uninstall it and then reinstall it from the respective app store can often be the quickest and most effective solution. Here’s why this troubleshooting method is valuable:
Clearing Cache and Data: Uninstalling an app not only removes the application itself but also clears any accumulated cache and temporary data associated with it. Over time, this data can become corrupted or outdated, leading to performance issues or crashes. By reinstalling the app, you start with a clean slate, which can resolve many problems.
Updating to the Latest Version: Reinstalling from the app store ensures that you are getting the most up-to-date version of the app. Developers frequently release updates to fix bugs, improve performance and enhance security. By reinstalling, you ensure that you’re running the latest, most stable version of the app.
Resolving Configuration Issues: Sometimes, app settings or configurations can become corrupted, leading to erratic behavior. Reinstalling the app resets all settings to their default values, which can resolve configuration-related problems.
Eliminating Hidden Bugs: Persistent issues may indicate an underlying problem with the app’s code. Reinstalling the app can help eliminate hidden bugs or glitches that may have crept into the app’s files over time.
Saving Time and Effort: Troubleshooting app issues can be time-consuming and complex. Uninstalling and reinstalling the app is a relatively quick and straightforward process that doesn’t require extensive technical knowledge. It’s often faster than trying to diagnose and fix issues manually.
User Data Safety: In most cases, uninstalling and reinstalling an app won’t affect your user data or account information, as long as you’re using cloud-based services for data storage or have backed up important data. This means you can start fresh without losing valuable information.
However, before uninstalling, it’s a good practice to check for any available updates for the app and try clearing the app’s cache and data if possible. Additionally, if you have data that’s not backed up and is critical to you, consider exploring backup options or contacting the app’s support for guidance on preserving your data during the process.
In summary, the “uninstall and reinstall” method is a valuable troubleshooting technique for resolving persistent app problems. It offers a clean slate, the latest updates and a quick resolution to common issues, making it a go-to strategy for improving app performance and stability.
To delve further into this matter, we encourage you to check out the additional resources provided here: Fix problems downloading apps from the Play Store – Google Help
Check for Software Updates
Ensure your tablet’s operating system is up to date, as this can affect app stability.
Keeping your tablet’s operating system up to date is not just a matter of receiving the latest features; it’s a vital practice that can significantly impact your tablet’s overall performance, security and app stability. Here’s why ensuring your tablet’s OS is current is of paramount importance:
1. Enhanced Security: Operating system updates often include critical security patches. Cyber threats are constantly evolving and OS updates serve as a crucial line of defense against vulnerabilities that could be exploited by malicious actors. Neglecting updates can leave your tablet exposed to potential security breaches, data theft and malware attacks.
2. Bug Fixes: App stability and overall performance can be compromised by underlying software bugs. OS updates frequently address these issues, improving the stability and reliability of your tablet’s software ecosystem. By keeping your OS current, you’re ensuring that apps run smoothly and don’t crash unexpectedly.
3. Compatibility: App developers work diligently to create software that functions seamlessly on the latest OS versions. As a result, older OS versions may encounter compatibility issues with newer apps. Keeping your tablet’s OS up to date guarantees that you can access the latest apps and features without encountering compatibility hurdles.
4. Performance Enhancements: OS updates often come with performance optimizations. These improvements can enhance the overall speed and responsiveness of your tablet. Whether you’re multitasking, gaming or streaming content, a well-maintained OS ensures a smoother user experience.
5. New Features: Beyond stability and security, OS updates can introduce exciting new features and functionalities to your tablet. These enhancements can expand your tablet’s capabilities and offer novel ways to use your device for work, entertainment or creative endeavors.
6. Longevity: Regularly updating your tablet’s OS can extend its lifespan. As older OS versions become outdated and unsupported, your tablet may become more vulnerable to security risks and less capable of running newer apps. Keeping the OS up to date ensures your tablet remains relevant and functional for years to come.
7. Data Backup and Restore: Before performing an OS update, it’s advisable to back up your data. This practice not only safeguards your important files and settings but also allows you to restore your tablet to its previous state in case anything goes wrong during the update process.
8. Automatic Updates: Most modern tablets offer the option for automatic OS updates. Enabling this feature ensures that your tablet receives the latest updates as soon as they become available, reducing the risk of forgetting to update manually.
9. User Support: When you encounter issues with your tablet, manufacturers and app developers are more likely to provide support and assistance if your tablet is running the latest OS version. Outdated systems may receive less attention from support teams.
In conclusion, keeping your tablet’s operating system up to date is a proactive measure that pays dividends in terms of security, stability and overall user experience. It’s a practice that not only safeguards your tablet against potential threats but also ensures that it remains a versatile and reliable companion in your digital endeavors. By staying current with OS updates, you’re optimizing your tablet’s performance, longevity and capabilities while minimizing the risks associated with outdated software.
Explore this link for a more extensive examination of the topic: Basic troubleshooting steps to solve problems and issues in Adobe …

Check Volume Settings
Make sure the volume is turned up and not on silent or in “Do Not Disturb” mode.
Ensuring that your tablet’s volume is appropriately adjusted and not set to silent or “Do Not Disturb” mode is essential for an uninterrupted audio experience. Here’s why this step is crucial and how to address it:
1. Audible Alerts and Notifications: Having your tablet on silent or in “Do Not Disturb” mode can lead to missed calls, messages and other important notifications. It’s essential to have your device’s volume on if you want to stay informed and reachable.
2. Multimedia Enjoyment: If you’re using your tablet for entertainment purposes, such as watching videos or playing games, having the volume on is essential to fully immerse yourself in the experience. Silent mode can rob you of the audio nuances that enhance your enjoyment.
3. Alarm Clock Function: Many people use their tablets as alarm clocks. If your tablet is in silent or “Do Not Disturb” mode, you might sleep through your alarms, potentially causing disruptions to your schedule.
To ensure that your tablet’s volume settings are optimized:
Check the Physical Buttons: Most tablets have physical volume buttons on the side. Ensure that these buttons are not in the “mute” position and adjust the volume to your preference.
Check the Notification Settings: Go to your tablet’s settings and navigate to the sound or notification section. Here, you can verify the volume level for various functions like ringtones, notifications and media. Adjust these settings according to your preferences.
Do Not Disturb Mode: If you use “Do Not Disturb” mode, be sure to configure it to allow important calls or notifications to come through during specific periods while silencing less critical ones. This way, you can enjoy peace and quiet when needed without missing urgent alerts.
Silent Mode: If you’ve intentionally put your tablet in silent mode, remember to switch it back to normal mode when you’re done. It’s easy to forget that your tablet is on silent and miss important calls or messages.
By keeping your tablet’s volume settings in check, you’ll be able to fully utilize its audio capabilities for communication, entertainment and productivity, ensuring that you don’t miss out on any important information or experiences.
If you’d like to dive deeper into this subject, there’s more to discover on this page: Troubleshooting speaker or microphone issues on your mobile …

Restart Your Tablet
A simple reboot can sometimes fix audio issues.
Indeed, the power of a simple reboot should not be underestimated, especially when it comes to troubleshooting audio issues on your tablet. Here’s why restarting your tablet can work wonders for audio-related problems:
Refreshed Software: Over time, your tablet’s software may encounter glitches or minor hiccups that affect various functions, including audio. A reboot essentially refreshes the entire operating system, closing all running processes and clearing any temporary software issues. When your tablet starts up again, it does so with a clean slate, often resolving audio problems in the process.
Resetting Audio Drivers: Restarting your tablet can also reset audio drivers and associated services. These drivers are essential for sound output and if they encounter issues or conflicts, it can lead to audio problems. A reboot ensures that these drivers start afresh, potentially eliminating any underlying issues.
App and Process Termination: Sometimes, audio problems may arise due to misbehaving apps or processes that are hogging system resources. When you reboot your tablet, these troublesome elements are terminated, freeing up resources for the audio system to function properly.
Clearing Cache: Certain audio-related data and cache files may accumulate during regular use. While these files are intended to enhance audio performance, they can occasionally become corrupted or outdated, leading to problems. Rebooting your tablet clears these cache files, which can contribute to resolving audio issues.
Addressing Connectivity Problems: Audio problems can also stem from connectivity issues, such as Bluetooth connections that aren’t functioning correctly. A reboot can reset these connections, providing a fresh start for troubleshooting and re-establishing audio connections.
Updates and Configuration Changes: If you’ve recently installed system updates or made changes to audio settings, a reboot may be necessary to apply these changes fully. Restarting your tablet ensures that updates are properly integrated and that any configuration adjustments take effect.
Time-Saving Solution: Rebooting is a quick and straightforward troubleshooting step that requires minimal effort and technical expertise. It’s often the first recommended action by support teams and can save you the time and frustration of digging deeper into complex audio problems.
Here’s how to perform a reboot on different tablet platforms:
Android: Press and hold the power button until the “Power Off” or “Restart” option appears on the screen. Select “Restart” to reboot your tablet.
iOS (iPad): Press and hold either the power button or the power button and volume down button (depending on the iPad model) until you see the slider to power off. Slide it to turn off your iPad and then press and hold the power button again to turn it back on.
Windows: On Windows tablets, you can reboot by clicking the Start button, selecting the Power icon and choosing “Restart.”
In conclusion, when faced with audio issues on your tablet, remember that a reboot can often be a simple yet highly effective solution. It’s a troubleshooting step that should be in every tablet user’s toolkit for addressing a wide range of audio-related problems and maintaining a smooth and enjoyable user experience.
Additionally, you can find further information on this topic by visiting this page: Tablet Won’t Charge – Here Are 9 Ways To Fix
Plug and Unplug Headphones
If you’re using headphones, plug and unplug them to see if that restores sound.
When facing sound issues while using headphones, the simple act of plugging and unplugging them can often work like a charm to troubleshoot and potentially restore audio. Here’s why this technique is effective and some additional tips to consider:
1. Connection Check: Sometimes, the audio issue may stem from a loose or imperfect connection between your device’s audio jack and the headphone plug. Plugging and unplugging the headphones helps reestablish a secure connection, eliminating any potential disruptions.
2. Dust and Debris: Over time, dust or debris can accumulate in the headphone jack, obstructing the connection. Removing the headphones and reinserting them can dislodge or clear away any foreign particles, restoring sound clarity.
3. Faulty Cable: If your headphones have a detachable cable, the issue might be with the cable itself. Reconnecting it by plugging and unplugging can help determine if the cable is the source of the problem. If it is, you may need to replace it.
4. Audio Source Recognition: In some cases, your device may not immediately recognize the headphones when they’re plugged in. By disconnecting and reconnecting them, you prompt your device to reevaluate the audio source, often resolving any confusion.
5. App-Specific Problems: Occasionally, the audio issue might be specific to an app or software program you’re using. Reconnecting the headphones can prompt the app to reconfigure its audio settings.
6. Software Glitch: Software glitches can occasionally disrupt audio output. Reconnecting the headphones can help refresh the audio software, potentially resolving any temporary issues.
7. Test with Other Devices: If the issue persists after trying the plug-and-unplug method, it’s a good idea to test the headphones with another device to determine if the problem lies with the headphones or the original device.
8. Audio Settings: Ensure that your device’s audio settings are correctly configured. Sometimes, sound can be muted or routed to the wrong output source, causing confusion. Adjusting these settings can make a difference.
9. Headphone Condition: Inspect the condition of your headphones, especially the headphone jack and cable. Physical damage or wear and tear can lead to sound issues. If you notice any damage, it might be time to replace the headphones.
10. Professional Assistance: If none of these steps resolve the sound problem, it may be a more complex issue related to hardware or software. In such cases, it’s advisable to seek professional assistance or consult the manufacturer’s support resources for further guidance.
In conclusion, the simple act of plugging and unplugging your headphones can often resolve audio issues, but it’s just one step in a series of troubleshooting techniques. By systematically addressing potential causes, you can identify and resolve the problem, ensuring that your audio experience remains uninterrupted and enjoyable.
You can also read more about this here: Troubleshoot Surface Dock or Surface Docking Station – Microsoft …

Check App Settings
Sometimes, apps have their own volume settings. Check the audio settings within the problematic app.
Sometimes, apps have their own volume settings that can be independent of your tablet’s system volume. When you encounter audio issues or unusual volume levels while using a specific app, it’s essential to delve into the app’s audio settings for a more targeted solution. Here’s how to address this:
1. In-App Volume Controls:
Begin by launching the problematic app and exploring its in-app audio settings. Look for options related to volume, sound effects or audio preferences. These settings may allow you to adjust the volume specifically for that app.
2. Media Playback Controls:
Many media and streaming apps provide dedicated playback controls within the app interface. You can typically find these controls while playing media content, such as music or videos. Check if the app has its own volume slider or buttons to adjust the sound level while content is playing.
3. Mute or Silent Mode:
Ensure that you haven’t accidentally muted the app or activated silent mode within the app itself. Some apps have a mute button or toggle that can mute all sounds or specific audio elements within the app.
4. Equalizer Settings:
Certain apps, especially music or audio player apps, may have equalizer settings that affect audio output. Adjusting the equalizer can significantly impact the audio quality and volume of the app. Experiment with different presets or customize the settings to your preference.
5. App-Specific Notifications:
In some cases, apps may have their own notification settings that can affect sound. These settings can include custom notification sounds or volume levels. Review the app’s notification settings and ensure they are configured as desired.
6. App Updates:
Outdated app versions can sometimes exhibit audio-related issues. Make sure that the problematic app is up to date by checking for available updates in your tablet’s app store. Developers often release updates to address bugs and improve performance.
7. Reinstall the App:
If adjusting the in-app audio settings doesn’t resolve the issue, consider uninstalling and reinstalling the app. This can help refresh the app’s configuration and potentially resolve any underlying software glitches affecting audio.
8. System Volume Compatibility:
Keep in mind that even if you adjust the in-app volume settings, they may still be subject to the overall system volume level on your tablet. Ensure that your tablet’s system volume is not muted or set too low while troubleshooting app-specific audio problems.
9. Contact App Support:
If you’ve exhausted all troubleshooting options and the issue persists, consider reaching out to the app’s customer support or checking user forums dedicated to the app. Sometimes, others may have encountered similar audio issues and can provide guidance or solutions.
By exploring the audio settings within the problematic app, you can address specific audio-related issues more effectively, ensuring a better and tailored audio experience while using your tablet.
Should you desire more in-depth information, it’s available for your perusal on this page: 12 fast fixes for common Android problems | Computerworld
Remember that before attempting any troubleshooting, it’s essential to back up your data to prevent data loss during the process. If you’re not comfortable troubleshooting on your own, don’t hesitate to seek assistance from the manufacturer’s customer support or visit a reputable repair center. By following these tips, you can often resolve common tablet issues and enjoy a seamless digital experience once again.
“Prioritizing data backup and seeking professional assistance when needed are vital steps in ensuring the longevity and reliability of your tablet. Here’s an extended perspective on why these practices are crucial:
Data is Irreplaceable: Your tablet likely contains a treasure trove of personal and professional data, from photos and videos to documents and contacts. Before delving into any troubleshooting process, take a moment to back up your data. This precautionary measure ensures that even if something goes wrong during troubleshooting, your valuable information remains safe and accessible.
Peace of Mind: Knowing that your data is securely backed up provides peace of mind. It removes the fear of losing irreplaceable memories or important work-related files, allowing you to explore troubleshooting options with confidence.
Manufacturer’s Expertise: While many common tablet issues can be resolved with online guides and user-friendly tools, there are instances where problems are more complex. In such cases, relying on the manufacturer’s customer support can be a game-changer. These experts are well-versed in the intricacies of their devices and can guide you through troubleshooting steps or provide solutions tailored to your specific problem.
Avoiding Further Damage: Inexperienced troubleshooting attempts can sometimes exacerbate the issue, leading to more significant problems. Seeking professional assistance from a reputable repair center helps prevent accidental damage and ensures that your tablet is in capable hands.
Time and Cost Efficiency: Troubleshooting on your own can be time-consuming, especially if you’re not familiar with the technical aspects of your tablet. It may also involve buying tools or software that you might use only once. In contrast, seeking professional help often leads to quicker and more cost-effective solutions.
Warranty Considerations: Attempting DIY repairs or troubleshooting without manufacturer-approved guidance can sometimes void your device’s warranty. When you’re unsure about the issue or the warranty implications, consulting customer support or a qualified technician is the safest route.
Expert Diagnosis: Technicians at reputable repair centers have access to specialized diagnostic tools and knowledge that can pinpoint underlying issues more accurately. This can result in a more effective and long-lasting repair.
Learning Opportunity: Seeking professional assistance doesn’t mean you can’t learn about your tablet’s inner workings. Many repair centers are happy to explain the problem and its solution to you, providing a valuable educational experience for future reference.
In conclusion, data backup and seeking assistance from the manufacturer’s customer support or a trusted repair center are essential steps to ensure the smooth functioning and longevity of your tablet. By following these tips, you not only safeguard your data but also make informed decisions when it comes to troubleshooting or repairs, ultimately enhancing your digital experience.”
Looking for more insights? You’ll find them right here in our extended coverage: Computer Basics: Basic Troubleshooting Techniques
More links
You can also read more about this here: Treatment for Alcohol Problems: Finding and Getting Help | National …